Coffee

8099 readers
16 users here now

☕ - The hot beverage that powers the world!

Coffee gadgets - It's always great to learn about new gadgets. Please share your favorite hardware or full setups. It might inspire newcomers to experiment!

Local businesses - Please promote your local businesses. If you are not the owner of the business you are promoting, kindly ask the owner if it's okay. It would be great if the business has a physical store to include an exterior or interior shot.

founded 1 year ago
MODERATORS
1


Tried this for a week on the road and it's become my go-to travel brewer.

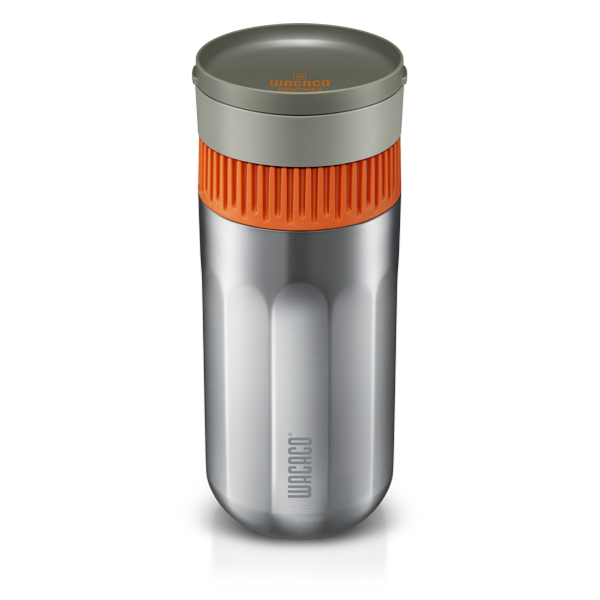
I'm a pour-over nerd and am happy to drink some mediocre cups here and there in the name of constant experimentation. Little mishaps that can occur during my delicate pour-over process get canceled out by the home runs. However, the combination of not having all my toys and tools when traveling and not always having good backup methods available if things go south has led me to the conclusion that pour-over is not the best fit for me outside my home environment. For several years I've been using an Aeropress Go when traveling. I hesitate to say anything negative about the beloved Aeropress on a coffee forum, but I was most often disappointed. People like the Aeropress for approximately the same reasons I like pour-over. It allows for the kind of fussiness to tweak and perfect brew recipes. I found differences with grind size, ratios, the amount of water used on my bypass, differences with the number or even the location of the stirs etc. etc. I've decided that I want to keep my tweaking confined to my home pour-over setup, and that I'd like all my other brewing methods to be more forgiving but with a reliably good outcome. When I heard about the pipamoka, it sounded like and attractive travel alternative. I played with it for a couple of weeks at home and then took to the road for a week with it. If you haven't heard of this thing - it's an insulated travel mug with a submersible puck with metallic filters on both sides of it. You fill the puck with medium size grounds (12-14g) and then with up to 245 mL of heated water. By slowly twisting an orange ring at the top of the cup you elevate the grounds puck up through the entirety of the water. You then remove the puck and elevator mechanism and can pour the coffee or pop the included lid on it and keep it insulated for hours. It produces a rich cup that has some real depth, and while slightly closer to the French Press side of things, I found it allows for the notes of a medium to medium light roast to shine through much brighter than FP does. It’s consistent as hell.

Here's why I love it for travel:

  • It brews a bigger cup than my Aeropress Go. No bypass is needed here and the brewer doubles as an insulated cup which I think is awesome. It also pours very neatly though too.
  • I typically brew for two but often an hour or two apart. The Aeropress meant that I either had to find an insulated vessel when traveling for the second cup or be available to brew on demand. Now I can brew and decant the first cup for myself, rinse things out, and then immediately brew another cup knowing it will stay warm in the insulated brew chamber for hours.
  • Cleanup involves rinsing or washing the cup, quick rinse of elevator mechanism, dumping out grinds from puck (not too bad), and rinsing out the filter puck. It’s minimally more involved than the aeropress go, but not really if you consider needing a cup and in my case often some sort of insulated vessel for the aeropress. Overall, it’s easy.
  • Forgiving with grind. Medium / Medium coarse works well. I didn’t tweak much, but somewhere around a 5 on Ode Gen II stock bur was perfectly good and here’s another thing – I have not been travelling with a grinder. I used the pre ground medium grind grocery store stuff on the road and IMO that stuff is far too coarse for the Aeropress, but works very well with the Pipamoka. Serious points for travel flexibility on this one. I am going to buy a portable grinder for my next trip I think though. I have arthritis and don’t love portable grinders because of that, but I’m still planning to give it a try to see if I can step the Pipamoka flavor up just a tad more.
  • Forgiving with the brew time. I started out timing my rotations to match the two minute recommended extraction time, but quickly resorted to just sitting on the couch and twisting this thing at a very steady relaxed pace (probably taking closer to 2.5min on average I would estimate). It really didn’t seem like a super-crucial variable in the brew outcome.

Things I don’t love about the Pipamoka:

  • I already mentioned my concerns about a portable grinder due to arthritis. Well, the pipamoka requires a pretty decent amount of force to rotate and you have to turn it quite a bit. It’s not terrible though, you get into a slow rhythm and if you don’t have arthritis, I doubt you’d mind at all. However, the ring that you rotate does get quite warm. I used 205F water at home, and water 30s off boil on the road. If you have sensitive skin at all, this ring does get uncomfortably warm. I didn’t like this and it seemed obvious for both better grip and heat insulation that this knob should probably have a bit better grip design and be rubberized.

  • Filling the puck with grounds is much more of a pain than it should be. There’s an extra part which is a little cuff that helps keeps your grounds from overflowing out of the puck while you scoop them in. First, I didn’t love that there was one more thing to rinse/wash/potentially lose. Most importantly though, there is yet another included part that is even easier to lose, but is quite important. There is a little brush that you need to brush grounds off the lip of the puck and push them toward the center so you can properly seal the fenestrated puck cover. If you used the recommended amount of grounds it’s really overflowing and I’m guessing this is because it’s designed so you end up with some compression packing on the grounds. It seems like perhaps a deeper puck and a little tamp would be a better solution. There has to be a less fussy way to do this. I really hope Wacaco releases a second version of this at some point that addresses this. Mehs

  • I remember not bringing enough paper filters for my Aeropress on a trip once and having to use paper towels. It wasn’t terrible actually, but I’m a fan of how paper filters crisp up coffee flavor and really like the idea of them holding back cafestol and adding one less thing to my diet that is trying to corrode my cholesterol numbers. For travel though, a good metal filter that keeps fines out really does make more sense than having to worry about your consumable stock.

TLDR: If you are a coffee control freak and really want to tweak and perfect your brew when traveling, consider the Aeropress option (Frankly, would just go with regular Aeropress – the “Go” isn’t all that much more portable and it’s too small IMO). If you want a reliable simple brew that you might not be able to achieve coffee nirvana with, but that will make a consistently good cup that stays warm, I currently think the Pipamoka takes the cake.

2


Haven't really used a mocha pot before, so I'm experimenting a little to find the right grind settings and ratios for my taste. Normally brew espresso on a flair classic. Went with this more modern design from bialetti because it also works on induction stoves.

3


After spending so much time and energy with an entry-level home coffee roaster, here are my takeways

Can it make great coffee?

Absolutely! My preference gravitates towards light roasts or lighter medium roasts. Although the Gene is not very good at light roasts, lighter medium roasts are easily achievable. The coffee you can roast at home may never be as good as what the best artisan roasters can produce, but it will always be 1000x better than commodity supermarket charcoal you can buy everywhere (and cheaper too).

Is it a good machine?

Yes and no.

  • It's easy to use because, apart from time, there is really just a single variable you can influence: maximum temperature. With a decent workflow you can produce excellent coffee, but it lacks everything people obsess about (temperature probes and Artisan integration, airflow control, power control, automation etc.) that makes a high-end home roaster much closer to a professional tool.
  • Ambient temperature (and I suspect humidity) influence it a lot, making batches hard to replicate. Target temperature and 1C can be as much as 1-1.5 minutes sooner in summer.
  • Airflow is everything, and chaff can easily block the chamber's intake, stalling the internal temperature at 220-230°C and "ruining" (control over) a batch.
  • Batch size is kinda small at 250g, so if you wanna roast larger quantities, you must do several small batches in a row. I usually roast 4x250g batches in a single session, and it lasts me about a month.

Are complicated workflows necessary?

No. My personal workflow is much simpler and basically the same for every bean after preheating the machine at 220°C for about 10mins:

  • Dry at 180°C for 3 minutes
  • Increase temperature to 135-145°C depending on the bean, it should get there around the 7min mark. Hold until 1C.
  • Once 1C starts rolling (depending on the bean, around 8-11min mark), reduce temp to 220°C and dump after 1 minute (I built an external cooler that adapts to my vacuum cleaner, do not use the built-in cooling function, it sucks)

Is it worth it?

If your local roasters suck, all you can access is supermarket coffee or your local or online roasters are prohibitively expensive (don't forget to still support great local businesses once in a while), if you've got time and love to experiment, if you love DIY, go for it!

4
5
6


I love coffee, but have a surplus of tea bags that I want to experiment with. Does anyone have suggestions for how to get started with tea? Or a simple recipe to use as a baseline? I'm only working with tea bags at this time, which appear to be 2g. I would also love to know how much agitation you are supposed to do with the tea bag itself.

7
8


I make aeropress at home, been my go-to for years. My taste in beans never really left the 90s though I do enjoy a fruity brew once in a while.

I know where the best dry cortado w/ oat-milk is in the Minneapolis - St Paul area.

A soft spot for a not-too-sweet miel.

Help me plan my "can't regret not doing that" coffee list?

Edit to answer some similar questions all at once: I'm not going to talk about my medical situation here, but yes, it was at the advice of a doctor. Decaf is a possibility, but I e been down that road before and it tastes like disappointment, even with today's improvements; maybe once in a while, though.

9
93
Beaks (mander.xyz)
submitted 1 week ago by avidamoeba@lemmy.ca to c/coffee@lemmy.world
 
 
10
 
 
11


Pour over guy here but I enjoy just a touch of oils in my extractions so I've settled on coffee sock use. Never liked the French Press side of things, but I've just learned about FP with paper filters, the Espro paper filter and more interestingly the Caffi bag filter. I'd like to experiment with this. The Caffi filter especially is appealing as the cleanup looks super easy (big change compared to my coffee sock ritual) and I like the idea of cleaning up the murky FP taste with some decent filtering. I'm considering trying an Espro device so I would have the option to try their paper filter too, but that's less interesting since you still have to clean grounds out of your FP bucket. The Espro devices are pricey though. I'm curious if anyone thinks the finer mesh buckets on the Espro would contribute any cleanup benefit at all if using a paper filter like the Caffi bag? I would assume the much finer filter mechanism of the paper would just trump any plunger filter mechanism. Ok, my next question is what's going on with insulated FP brewers? Stanley, Yeti, even Espro (they even make a travel mug FP that you just leave the grounds in!!) and many others make these. I don't mean to be rude, but are FP drinkers just barbarians that think there is no such thing as over-extraction? How in the world can you just leave coffee grounds sitting in contact with your brew for hours as these insulated FP brewers claim? Don't you need to decant as soon as the brew is complete?

12


Smoothest brew I've had in a while, no hint of sourness or bitterness.

13
 
 
14


Nothing fancy, just the raw essential on a rushed morning.

15


Hello out there, fellow caffeinated Lemmings!

Got anything new in your brew?

Did you make a mess-o of your espresso?

Did you French pull instead of French press?

Tell us about it for those valuable Internet points!

16


I hope this video encourages you to invest a little time and effort in your cleaning and maintenance!

17


Roasting with the Itop Skywalker roaster. This is a level of control I'm not used to lol.
The auto charge didnt work so accidentally hit the button too late.
Also I have no idea how to get rid of the notes.
How's it look?

18


Hey everyone, most likely you already saw this review of the Ascaso.

I was wondering, are the thermoblock really that good? Or it's just a paid Ad?

Seems quite a lot of money, and I remember someone mentioning that it is still not very stable in terms of temperatures. Also in the review, it does not show the greatest results.

In that price range it competes with Silvia Pro X and in some markets with Lelit Elizabeth. What are your takes on this one? Curious to discuss.

19


With global warming (and other factors) affecting coffee production and prices, I’ve noticed a couple of interesting patterns in marketing strategies for household and white label brands.

Everything is extra intense, high intensity, intensity 11 (probably comes with a free Spinal Tap record)… Robusta roasted past 5th crack, no doubt.

I also spotted a bag of highly exclusive “100% Robusta.” At this point I’m waiting for the other shoe to drop and for them to market “0% cyanide” coffee.

How’s everybody else’s grocery shopping experience these days? Is this a big trend in your area?

20
21
1
submitted 1 month ago* (last edited 1 month ago) by jabathekek@sopuli.xyz to c/coffee@lemmy.world
22
2
submitted 1 month ago* (last edited 1 month ago) by thirdBreakfast@lemmy.world to c/coffee@lemmy.world


I asked for some advice here a couple of months ago about transitioning to espresso from Aeropress, and have since done that, and thought my journey my have some lessons for others, or y'all might have some ideas for my remaining issues.

Journey

Instant -> Nespresso pods -> Aeropress -> multiple daily espresso

Machine

After a bit of research, I was quite keen on the Sage/Breville Dual Boiler, but it was well out of my price range. I ended up purchasing "The Infuser" which is like their bean to cup Barista Express without the built in grinder. I had been planning on getting the Bambino, but the Infuser was less money (AUD350 - perhaps this model is being retired) and seemed more like a 'real' espresso machine.

The Infuser is a 54mm portafilter, PID, three way valve machine. The water heats quickly (although not as quickly as the Bambino) although I tend to turn it on and let it sit for a while to let the group head warm through anyway.

It's supposed to have volumetric dosing, but the volume output changes with the grind, so perhaps this is just setting how many pumps of the little piston pump or something. It's not time either. In any case, it does allow you to make repeatable shots once you've dialed in and set it. The setting is very simple to change.

The water tank is plenty big enough for me, and the drip tray might be on the small side - I generally empty it every coffee but you could probably do two.

Accessories

I have a personal failing wherein I buy too many gadgets when I'm excited about a new hobby. I'd originally started with a Rhinowares hand grinder with my Aeropress, but had found a 2021 Timemore C2 on eBay which is nicer to hold, and grinds the same amount of beans with a lot less turns. Perhaps it is visibly more consistent particle size, or perhaps I'm imagining that to justify this purchase.

I'm very happy with the eBay puck screen I purchased. I don't know that it's making the coffee any better, but it's keeping the group head clean enough that I don't bother scrubbing it after each shot, and the pucks I tip out of the portafilter have gone from 6.5 to a 3.5 on the Bristol stool chart.

I also got the cheapest ring that goes over the portafilter I could get for charging the basket, and that plus reducing to around 16gm of beans (I only use the double unpressurised basket) means I don't up with tiny specks of coffee all over the kitchen which was a constant issue when I started.

I also have a $2 eBay needle distribution tool, a couple of swirls with that means that when I bang the portafilter on the bench a twice I have a pretty flat, clump free looking bed of grounds that I've just been tamping with the supplied plastic tamp. I've never used anything different, so this seems fine to me although I wish it was a tiny bit bigger as there's a visible ridge left around the outside after tamping. This is probably a future upgrade.

I bought a couple of 220mlish ceramic cups, which I love the look and experience of. If you popped in to see me, that's what I'd serve you, but for daily use I use Duralex 220ml latte glasses since I'm still getting used to the milk frothing process and it's easier to see how that's gone in a glass.

The Experience

My main concern going to espresso was that it would be more mucking on than the Aeropress and that I'd give up and go back to that. Actually, it's probably a similar amount of carry on - just more bench space. They are both more time consuming than the Nespresso machine, but in my opinion worth it for the better coffee experience.

Dialing in has been a bit of a challenge - I'm chasing 16 in, 32 out in 30 seconds, but the click steps on the Timemore seem too big. For example on the medium roast I'm drinking this week that recipe goes from 22 seconds to 50 seconds with a single click. I'm not sure if I'm doing something wrong - I don't think so. In any case, I've just been choosing whatever is closest, and altering the dose and tamp pressure tiny bits to try and improve it a little as I work though that lot of beans. This seems fine for milk drinks.

Fussing on frothing the milk seemed like an optional thing to me, and I wasn't sure I was going to bother (with the Aeropress I just microwaved my milk) but that silkiness of the milk coffee when this is done correctly turns out to very worth. My latte art is highly variable, tending to mostly rubbish @daddyjones@lemmy.world knows what I'm talking about. I think my frothing is fine, but other people seem to be able to decide when the white blob appears on top, whereas mine randomly appears when it feels like it - often too close to the end of the pour when the cup is full. I'm sure this is to do with distance and speed of the pour and I'm missing something important. Feel free to offer suggestions.

The steam wand on this Breville is quite slow (which is probably a plus for me while I'm learning to steam milk), and makes a horrid squealing noise that no one would want to hear in the morning. I don't know if that's all steam wands in the world, just this model, or just my machine or my technique, but the cure seems to be to lower the jug and make half a second of stupidly large bubbles then put the tip back in.

Stopping steaming when I was burning my hand on the jug (which seems to be the standard advice) produced coffee that wasn't hot enough, so I purchased a milk temperature gauge, and highly recommend this. I've started counting how many seconds after the jug is too hot for my hand before the temperature gauge is just touching the red zone, so I could probably ditch it now.

Conclusions

Basically - no regrets. I'm enjoying lovely coffees that feel like a treat every day. I think a grinder with finer steps might be in my (distant) future, and I'd like to solve my latte art issues, but overall the experience has been a source of joy.

23


I know high end grinders are probably worth it for espresso, but for pour-over coffee does it make that much difference? I use a Capresso Infinity at either fine coarse or medium coarse and that's about it. Visibly the grind size does look a bit variable to me. Since I'm already in conical bur territory here, are higher end grinders really going to make a noticeable difference in my pour-over brews? If you feel strongly the answer is yes, I'm also curious what you would recommend (but please don't bother naming anything over $500usd unless you provide a link to a used version that is in that range).

24


... but it's my most successful attempt at latte art so far. I also know the foam could be better, but I'm really chuffed about the progress I'm making and wanted to share it!

25
view more: next ›