Do It Yourself

7675 readers
1 users here now

Make it, Fix it, Renovate it, Rehabilitate it - as long as you’ve done some part of it yourself, share!

Especially for gardening related or specific do-it-yourself projects, see also the Nature and Gardening community. For more creative-minded projects, see also the Creative community.


This community's icon was made by Aaron Schneider, under the CC-BY-NC-SA 4.0 license.

founded 2 years ago
MODERATORS
1


cross-posted from: https://lemmings.world/post/11714128

I tried to make a phone "wallet" case. I used the inside of my old one (what you press your phone into), cardboard from a an old box and some leftover vinyl flooring. I originally wanted to glue everything but ended up stapling some bits. these pics where hastily made and don't do the thing justice. Let's see how well this holds up (I seldom have it in my pocket so that helps).

2


I have an overhead light in my bedroom that I absolutely despise. It's way too bright and it's right behind my phone/book/whatever when I'm lying in bed. We have other lights around the room, and so I'd like to replace it with someone else. I don't really want a ceiling fan there, but that's the only thing I can think of. Does anyone have suggestions of something fun to put in the center of a bedroom ceiling?

3


cross-posted from: https://slrpnk.net/post/11339091

My bathroom tub fixtures have seen better days. Pretty sure they're original to the house (~60 years). We have fairly hard water, and the prior owners were not the best at maintenance so no clue how long these slow leaks have been going on. But the shower handle is stuck hard on the valve, and the bath spigot is crumbling away and similarly fused in place. Hot and cold come off easily.

Does anyone have any tips for freeing the one handle and spigot? I've tried light tapping with a mallet on the back of the handle to no avail. The spigot seems bound pretty tightly, to the point where I'm concerned about damaging the pipe if I apply too much torque.

As for the leaks, I haven't decided if I'm going to just replace the valves, or try fiddling with/replacing the packing nuts. This is my first time messing with plumbing, but either way seems straightforward enough after watching a few videos.

Any tips/tricks/suggestions appreciated, thanks!

4
89
submitted 2 months ago* (last edited 2 months ago) by morgunkorn@discuss.tchncs.de to c/diy@beehaw.org


Hi everyone!

A slow week went by, with daily heavy rains it's not always easy to find the motivation to work outside.

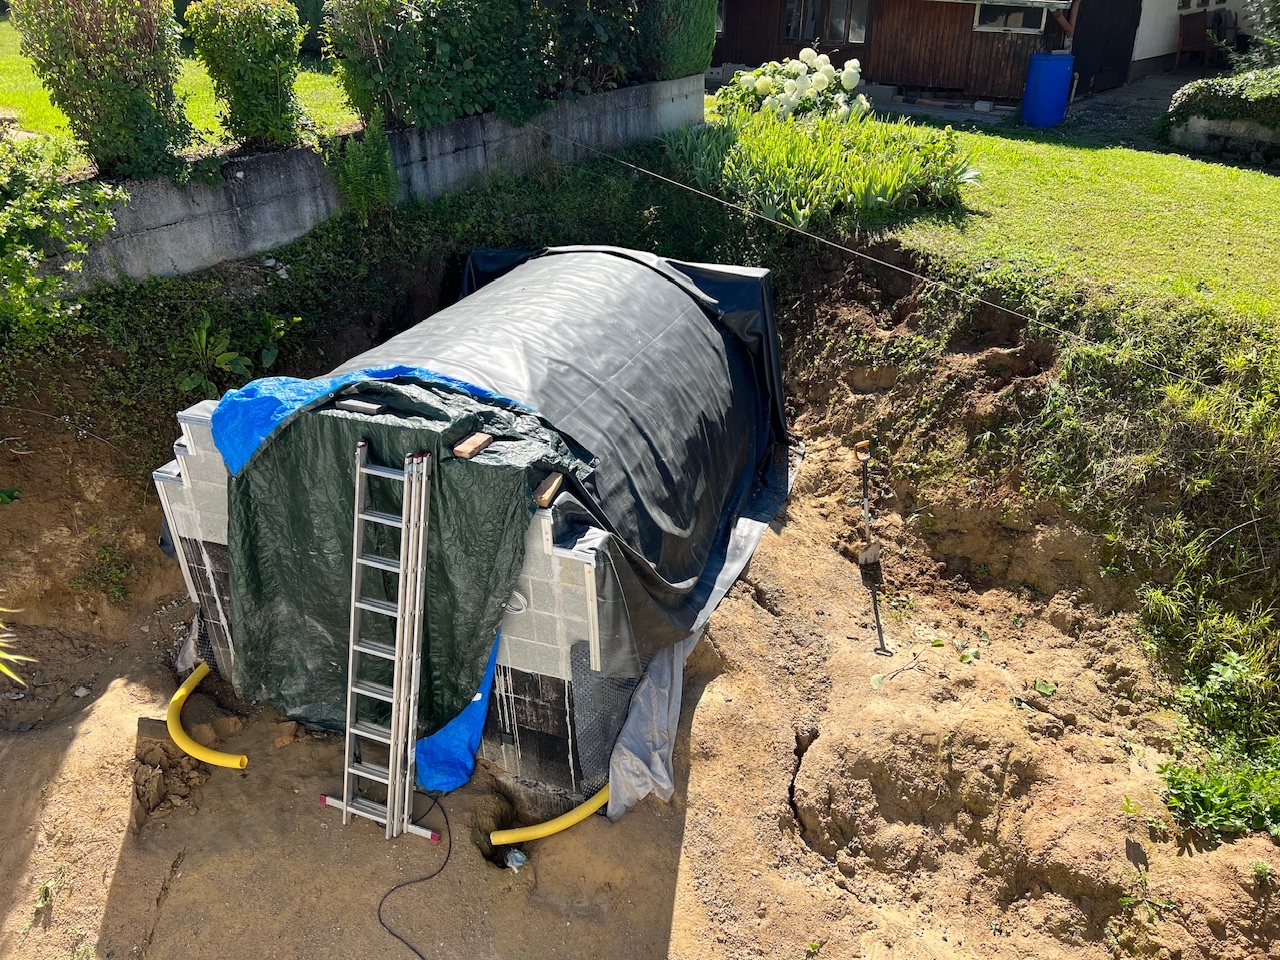
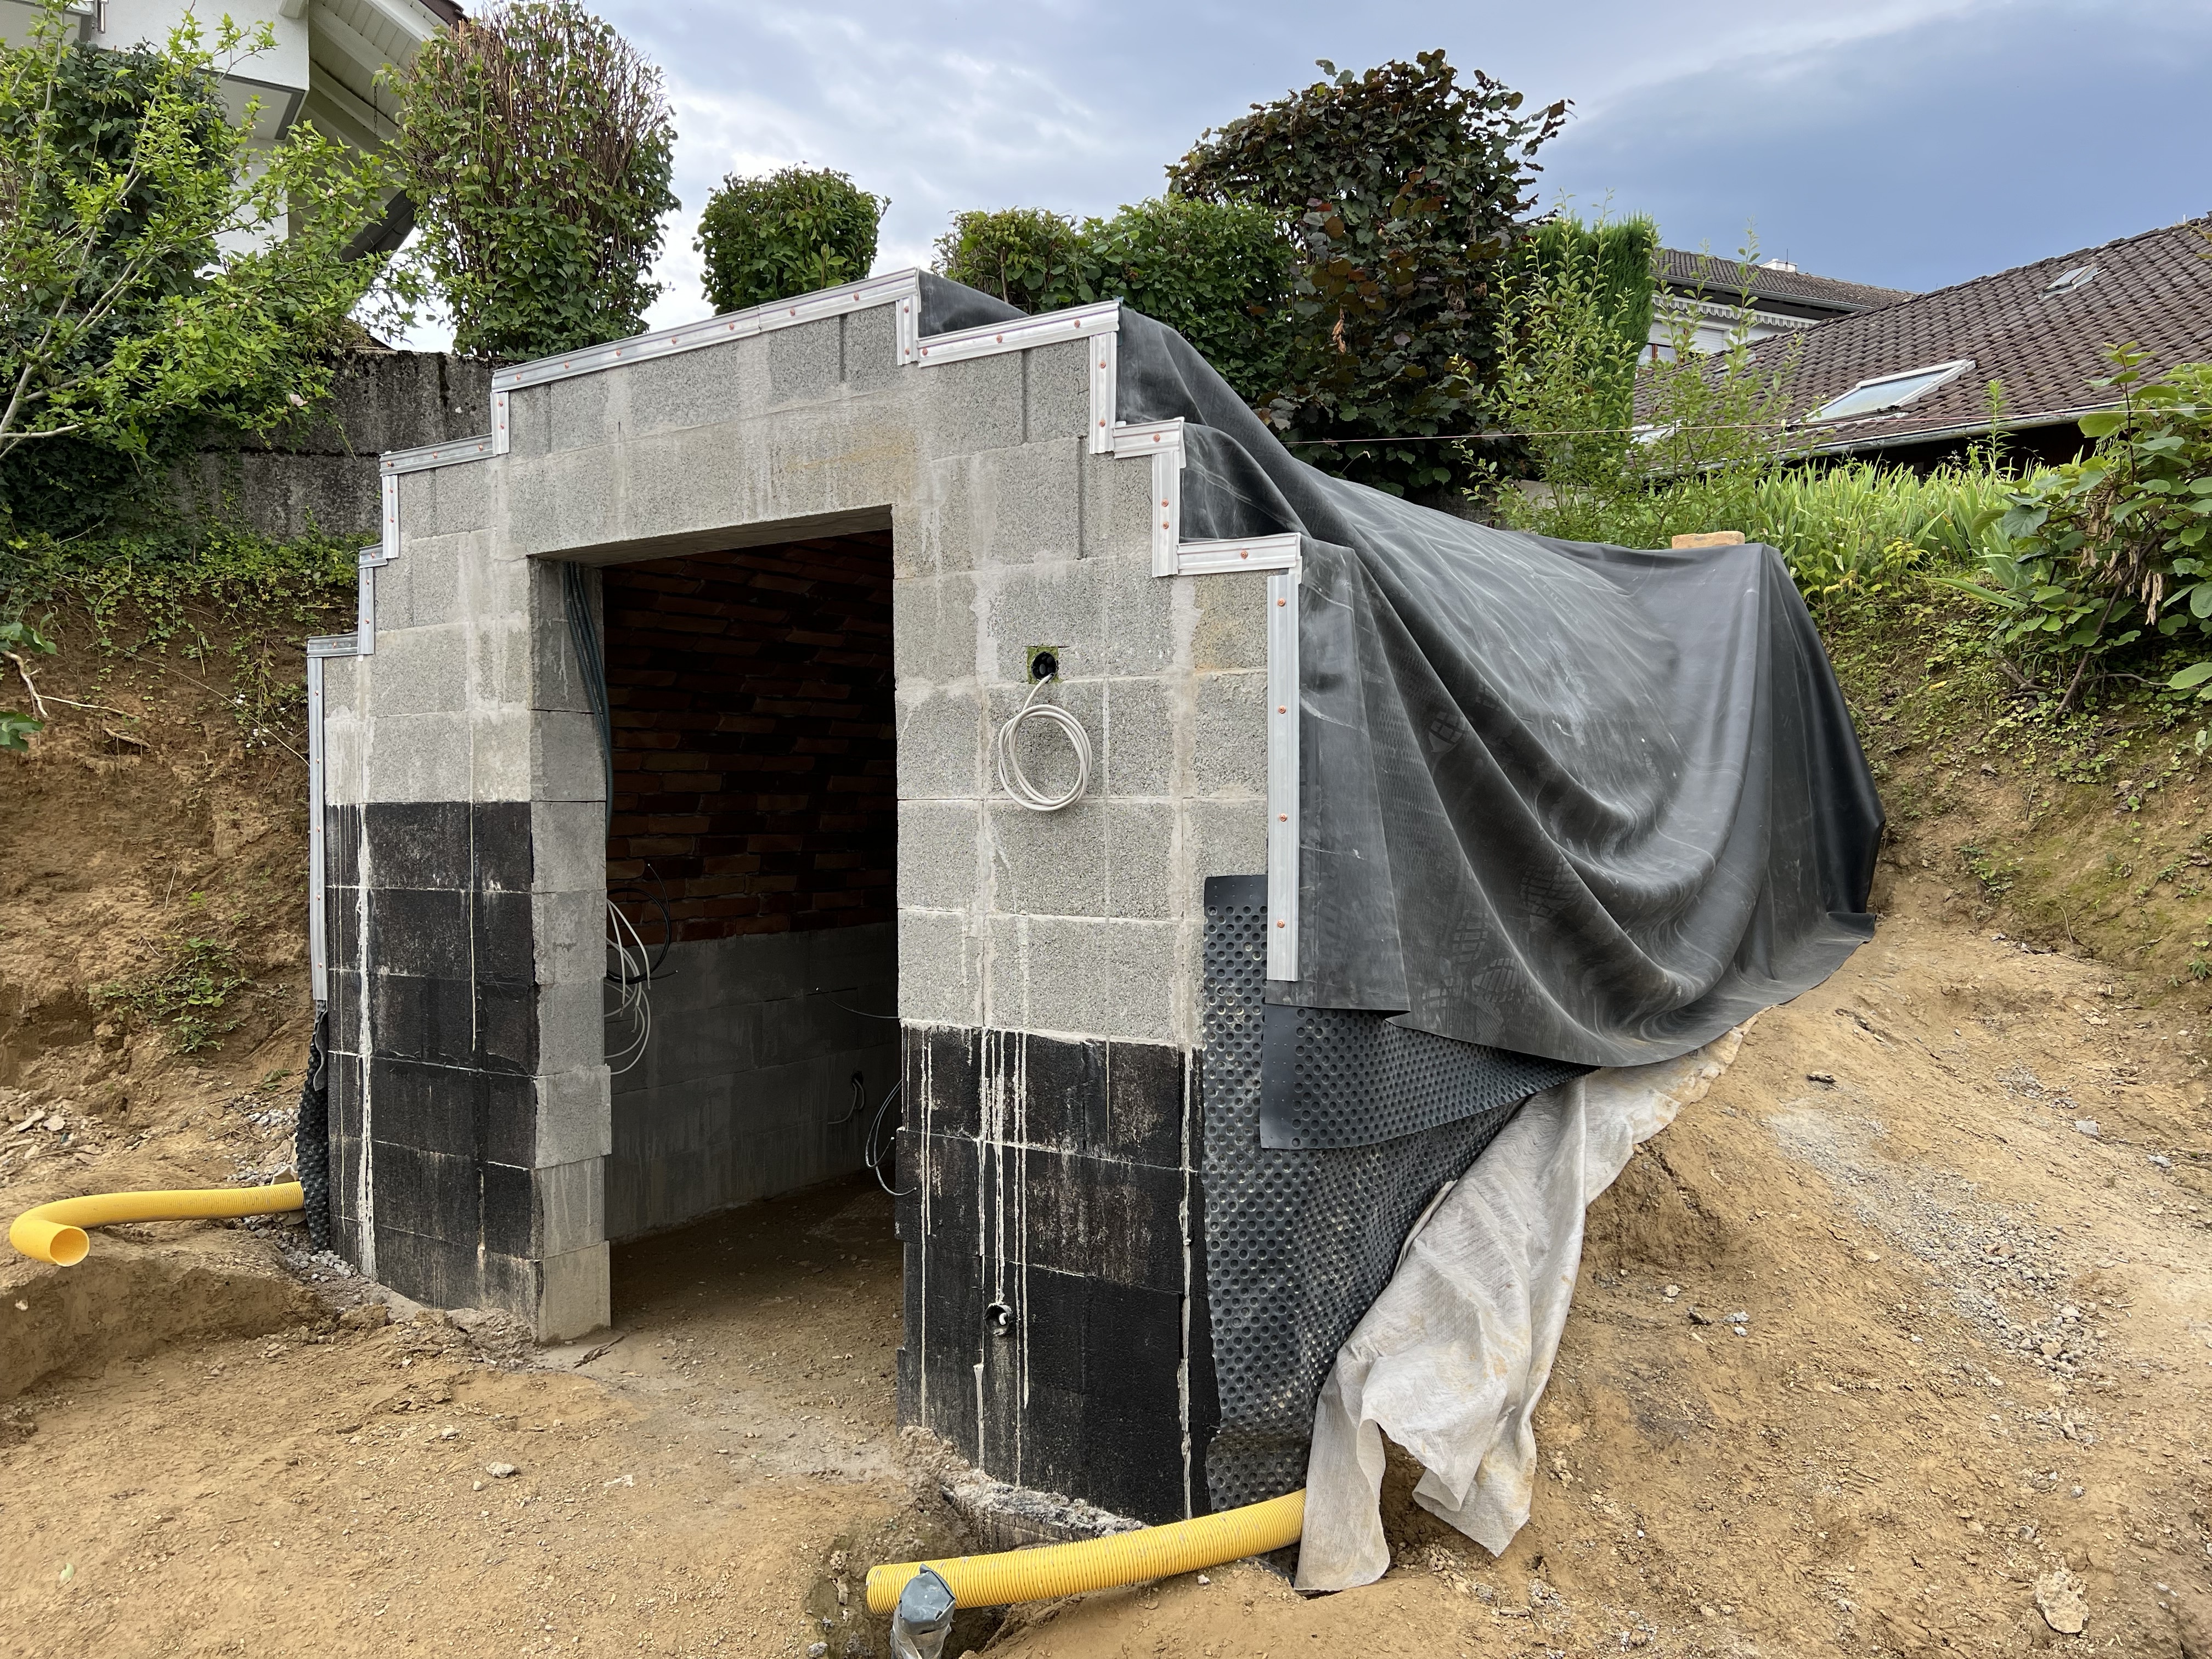
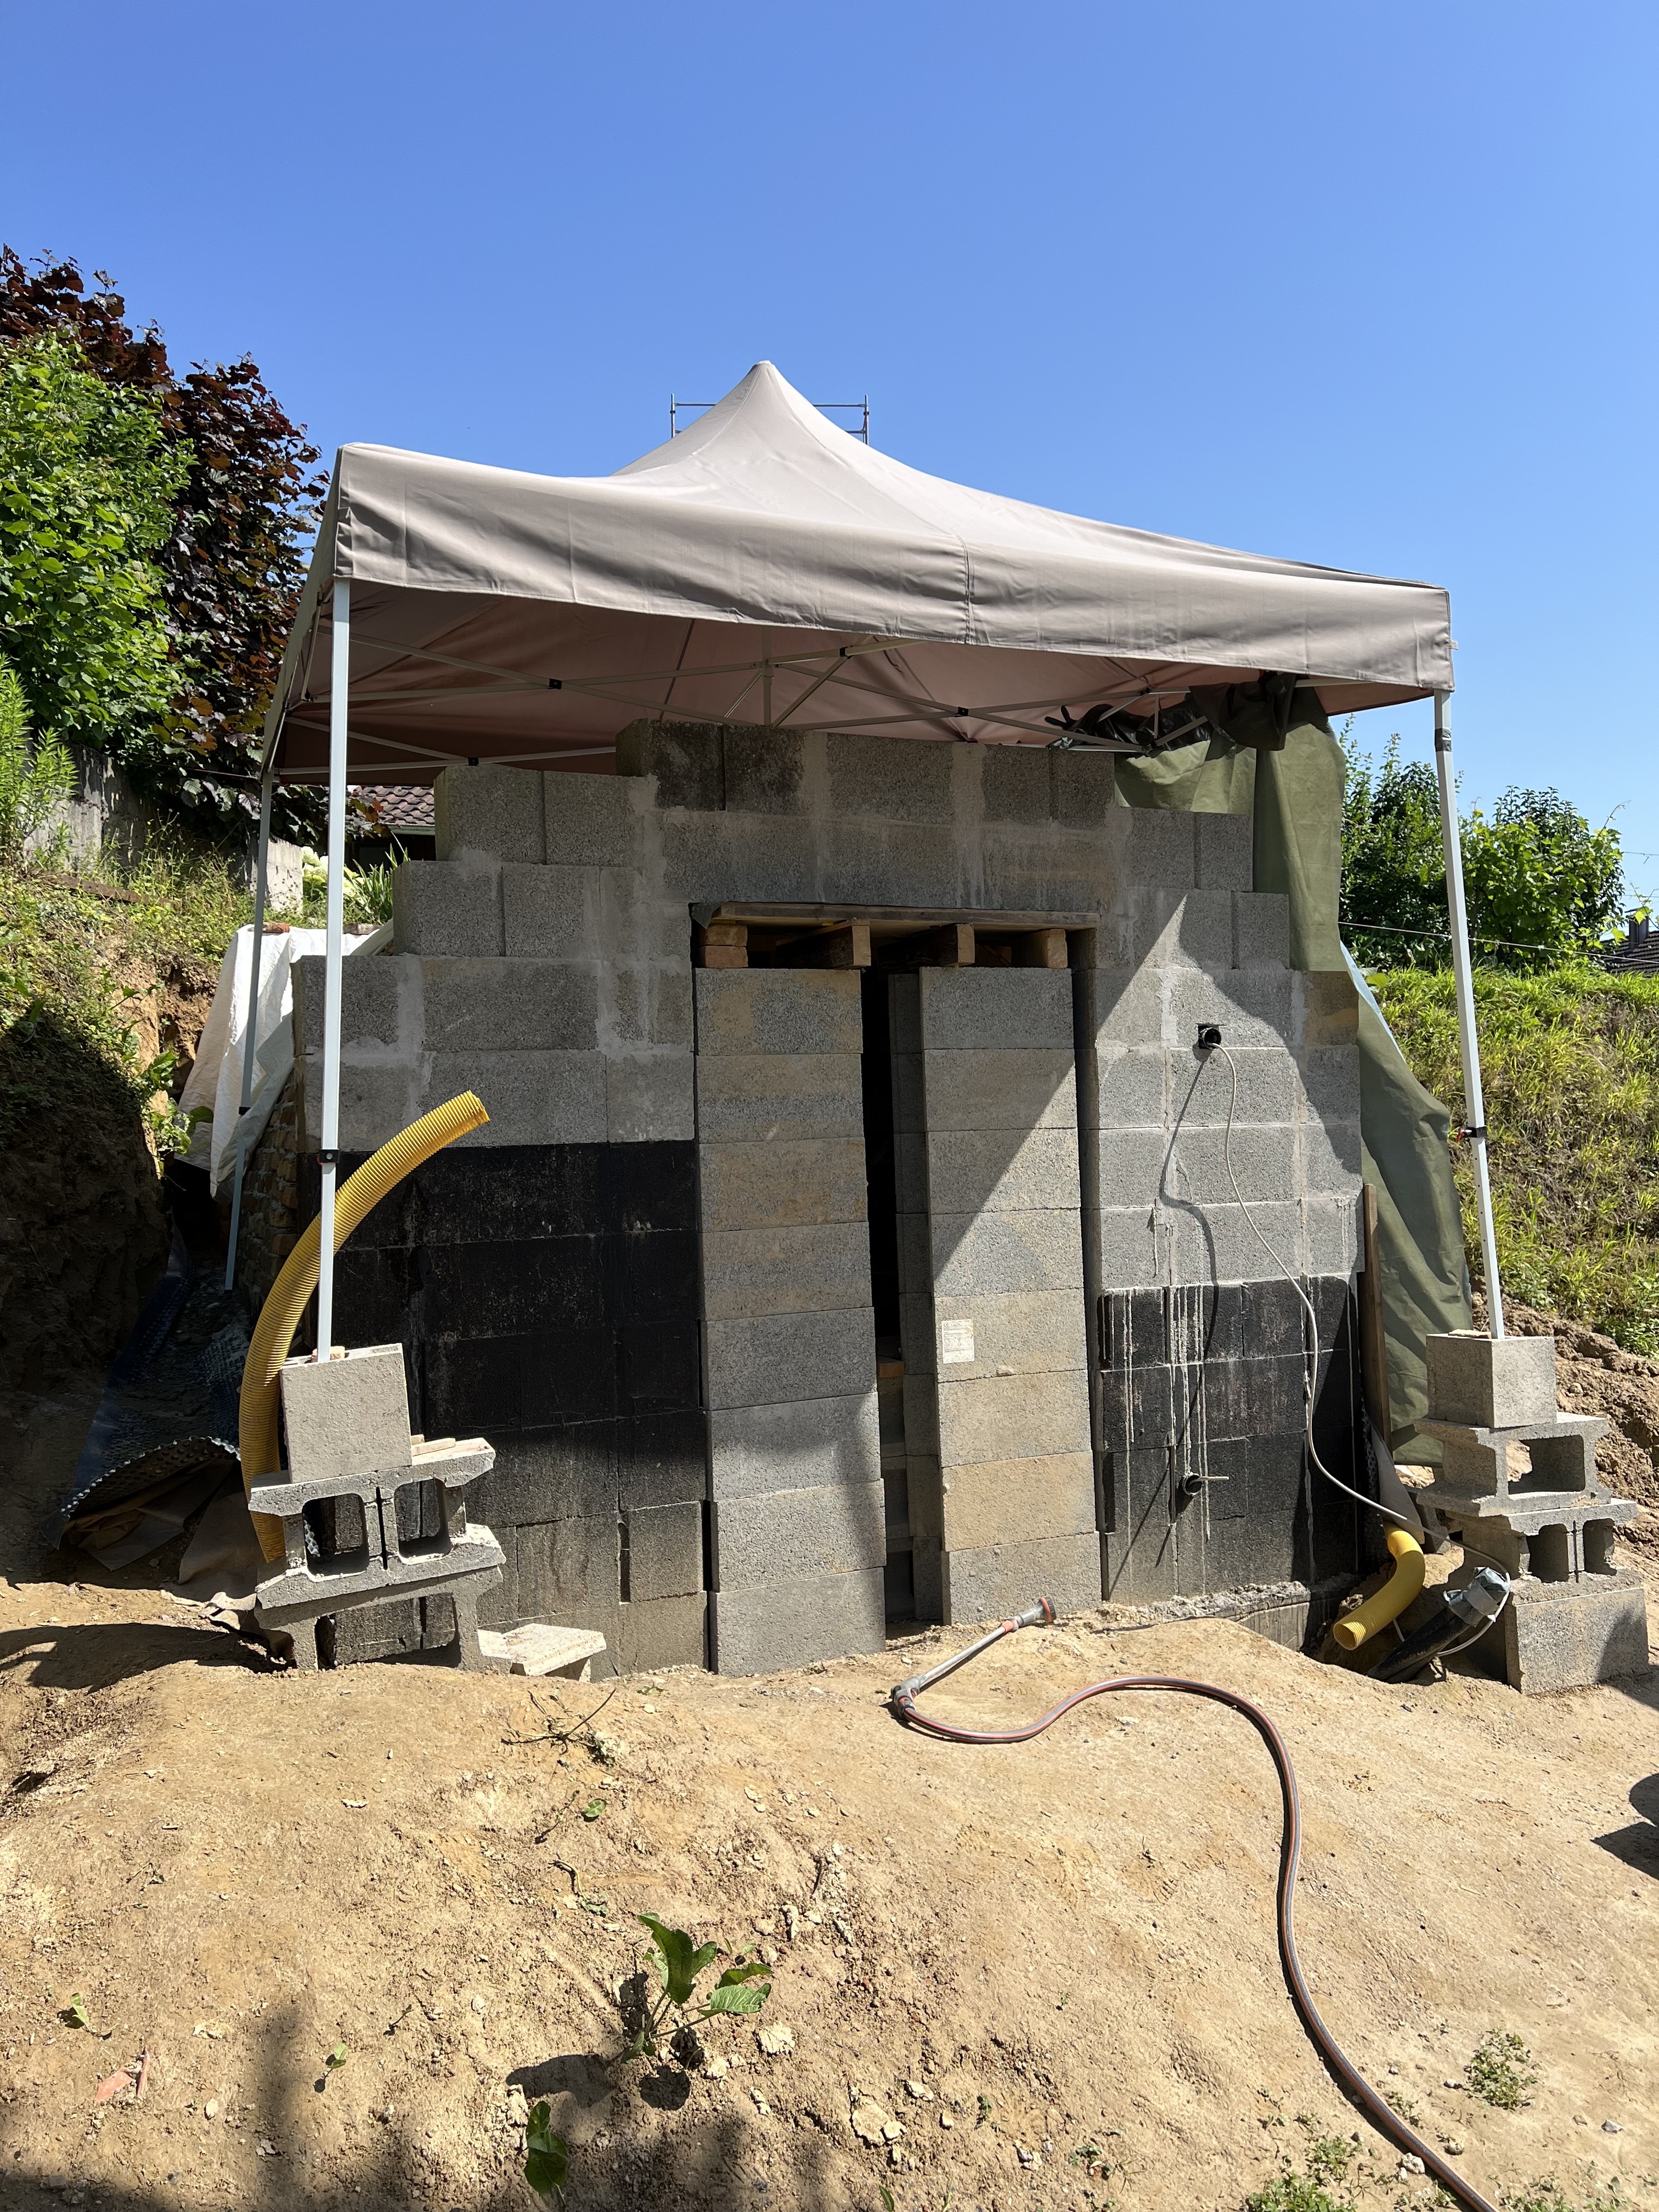
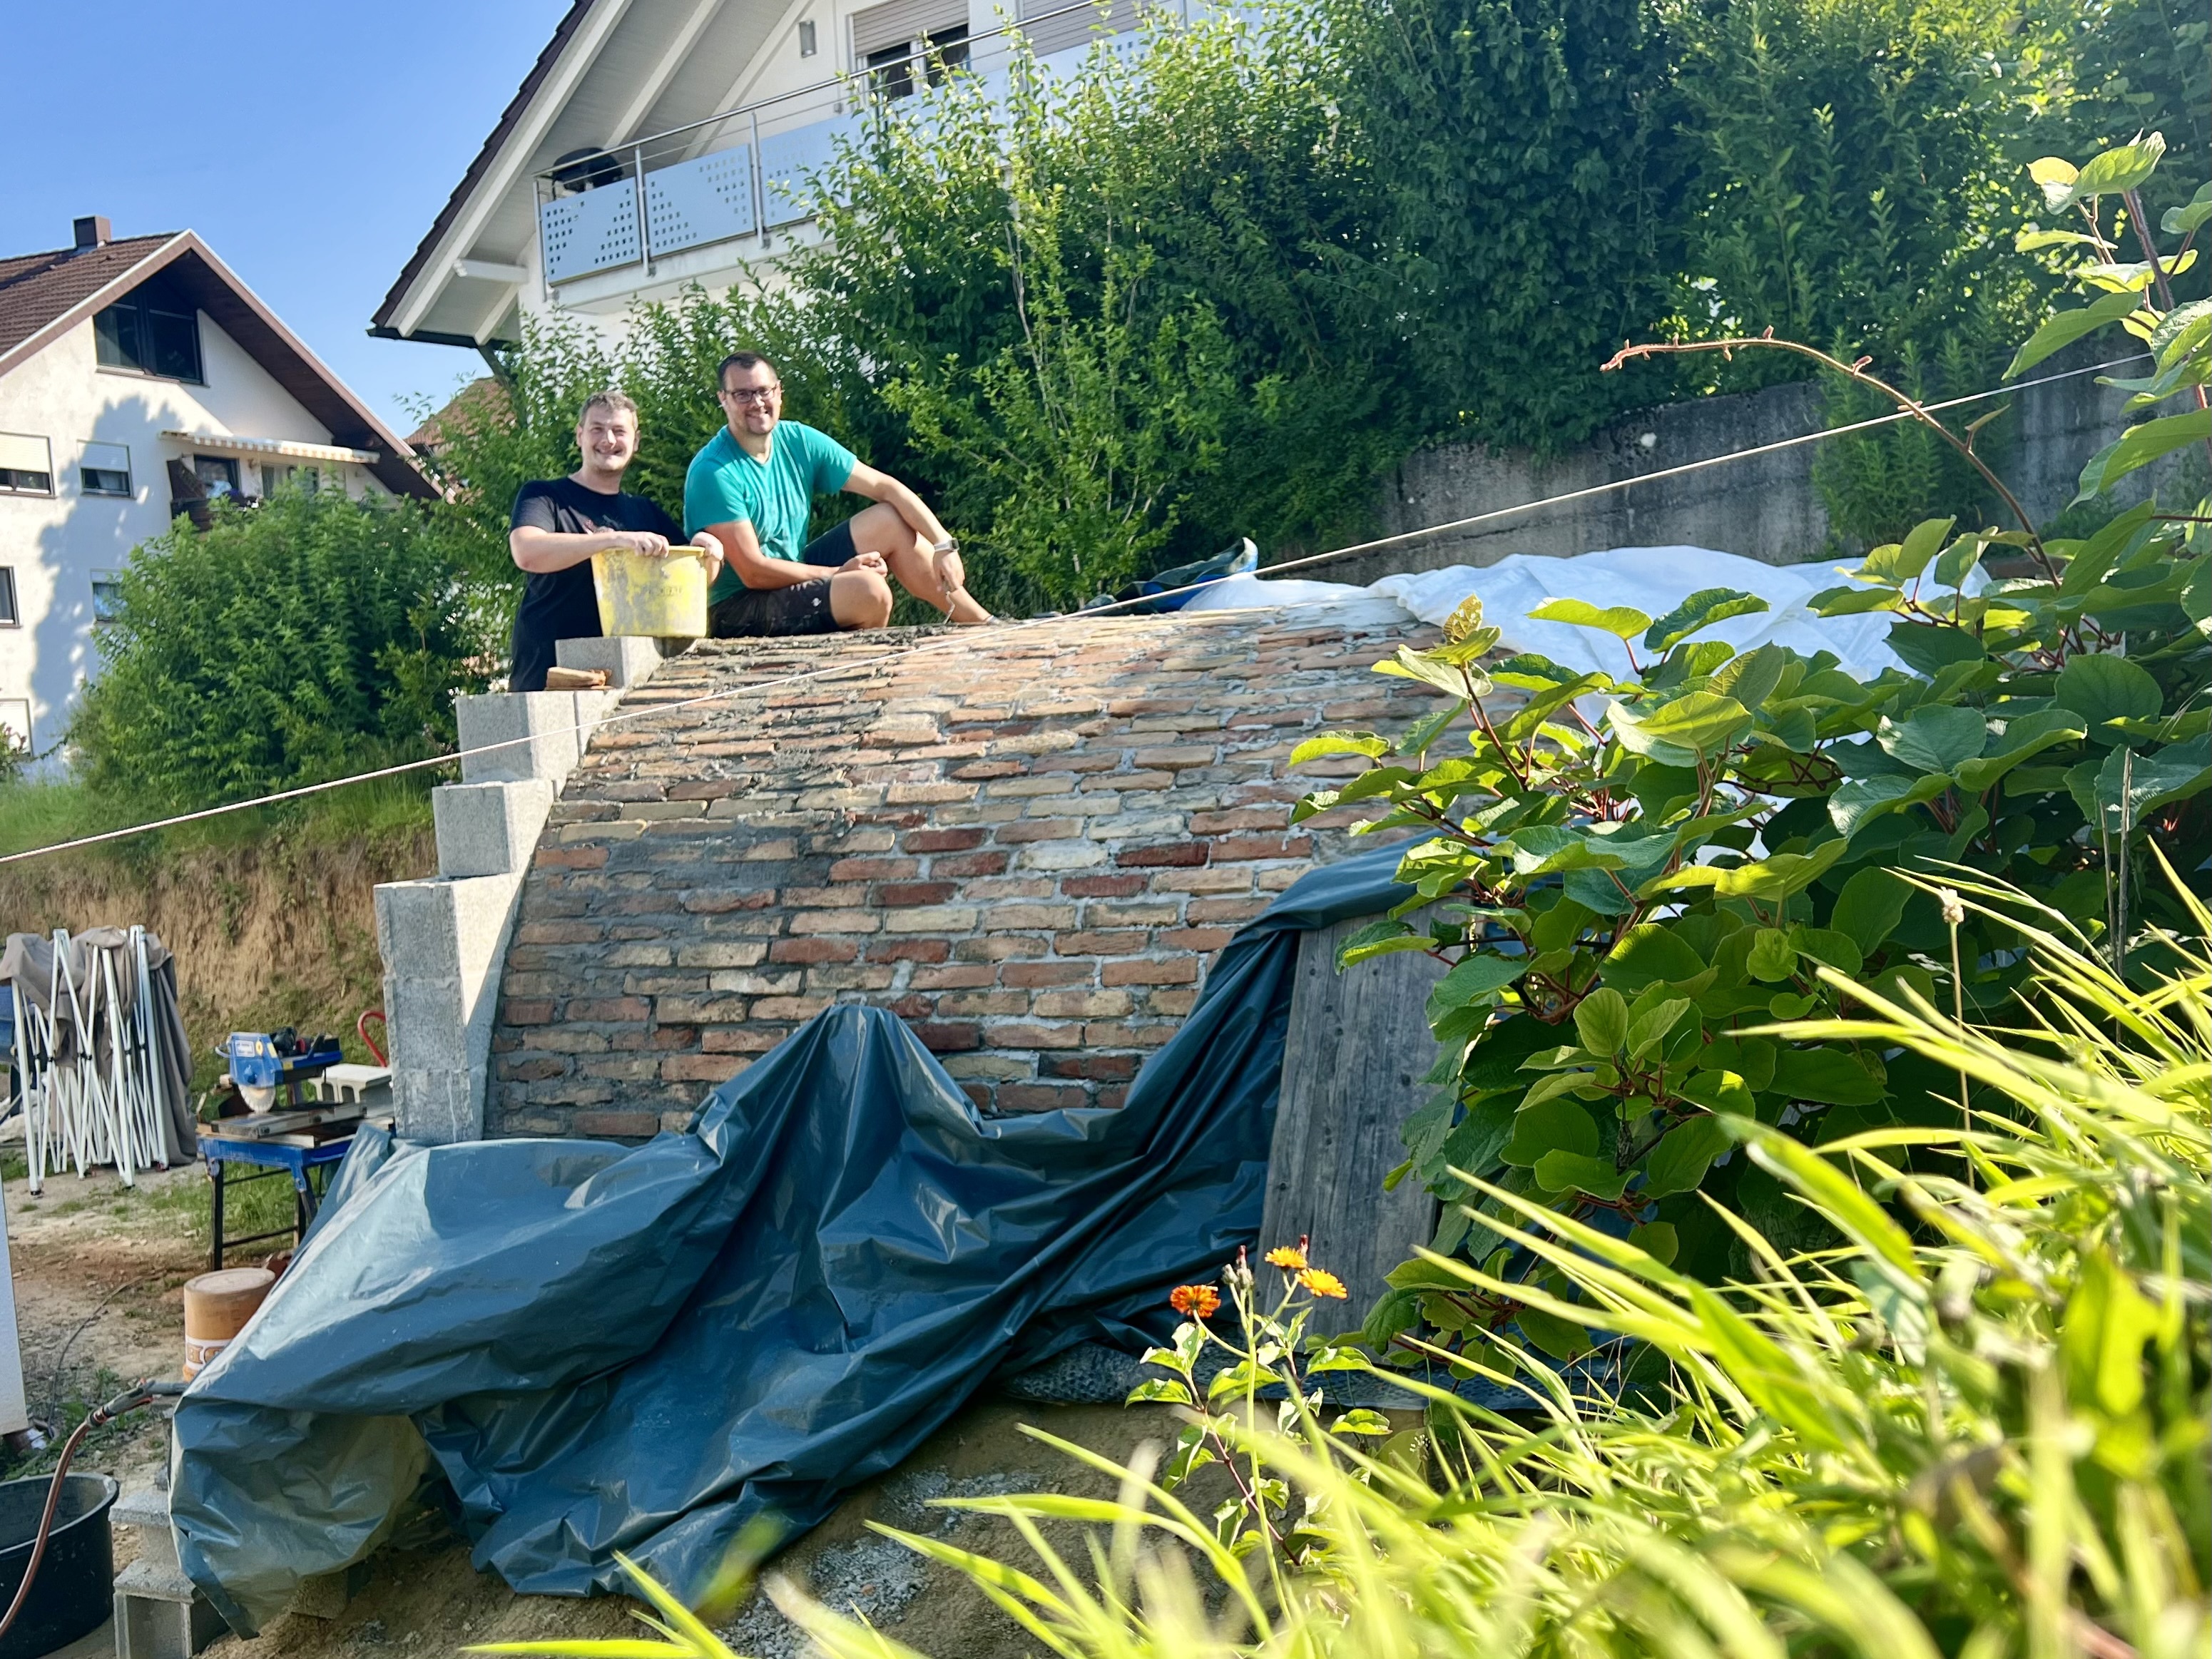
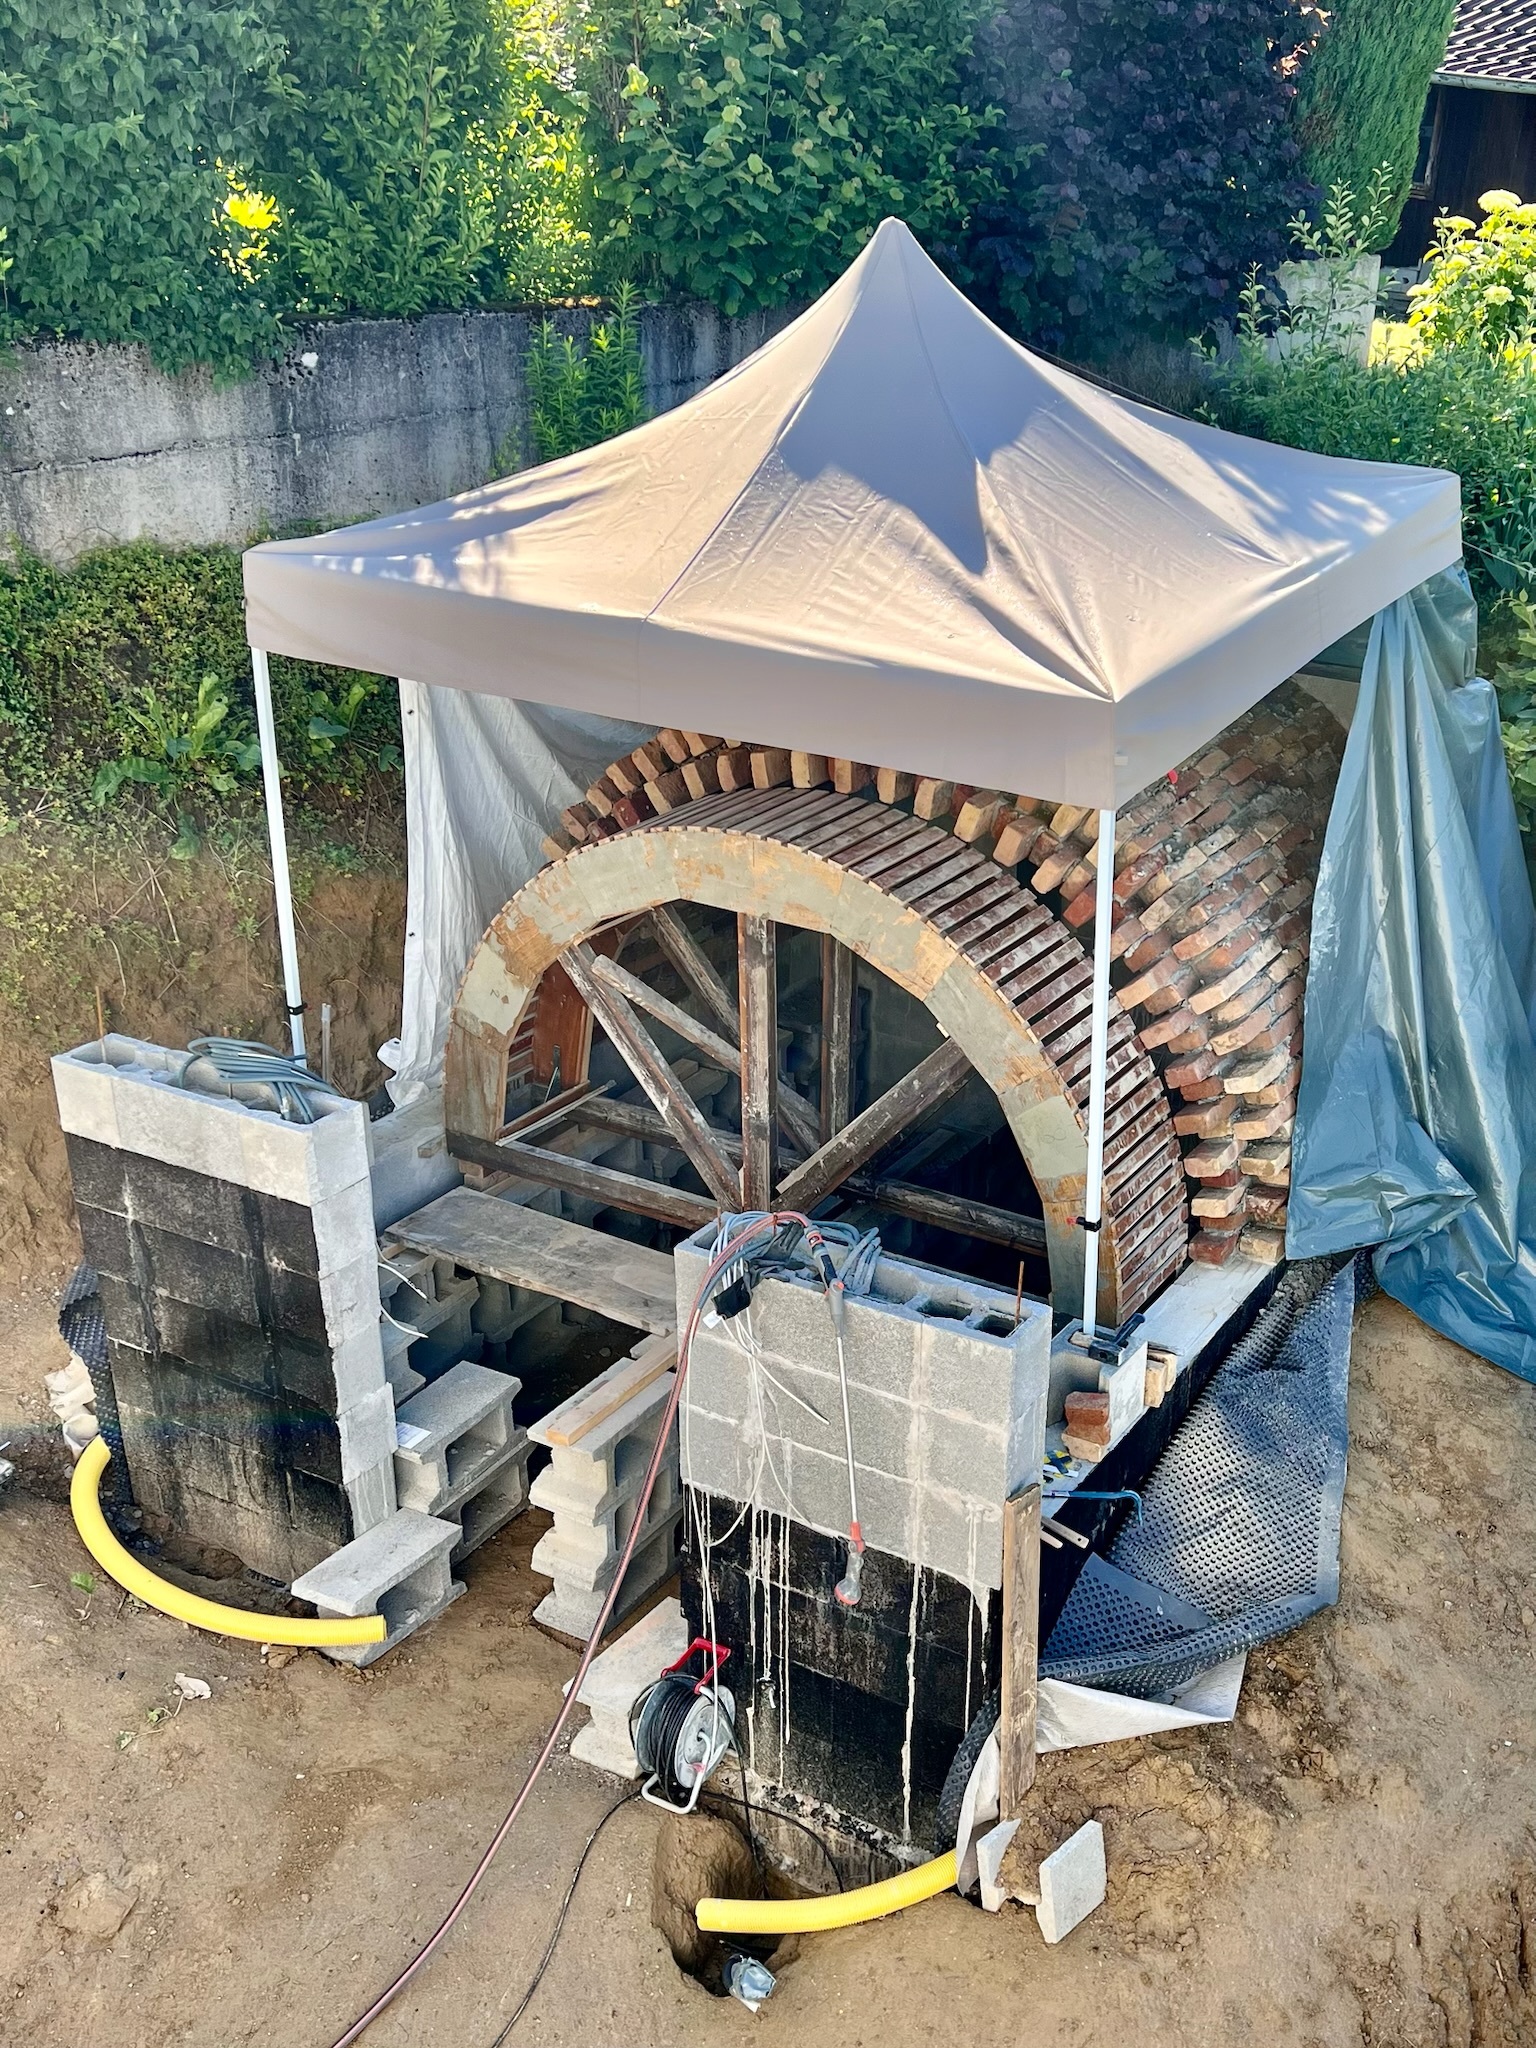
We installed a 50 square meter fleece and pond liner on top of the build, and started backfilling with dirt.

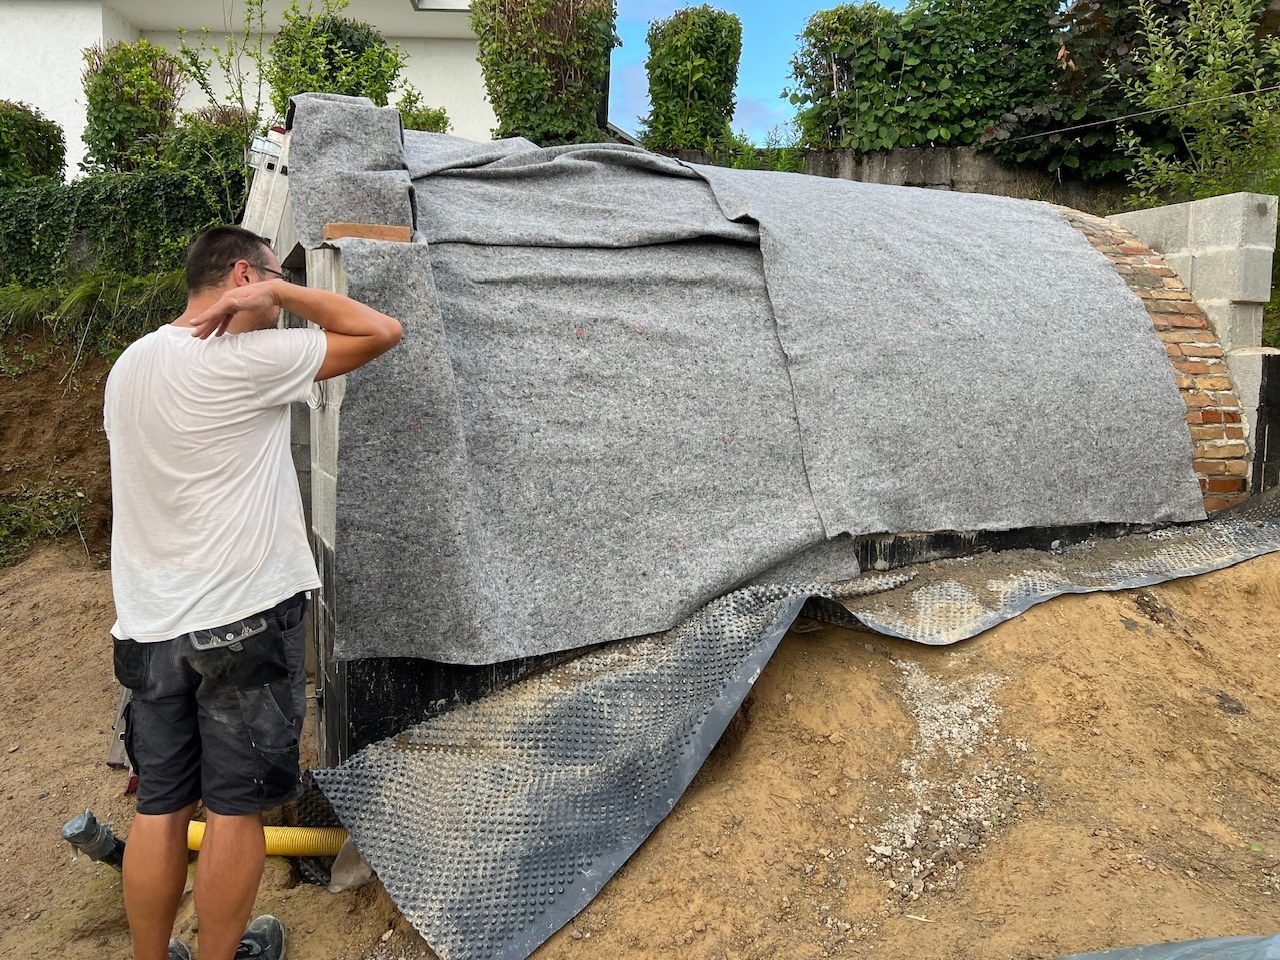
It's a lot of work because we have to dig the overgrown pile of dirt that's been sitting for 5 years on our lot, first getting rid of the roots in the top soil. But we have to do this manually as the back is only reachable through a narrow path in our neighbor's garden.

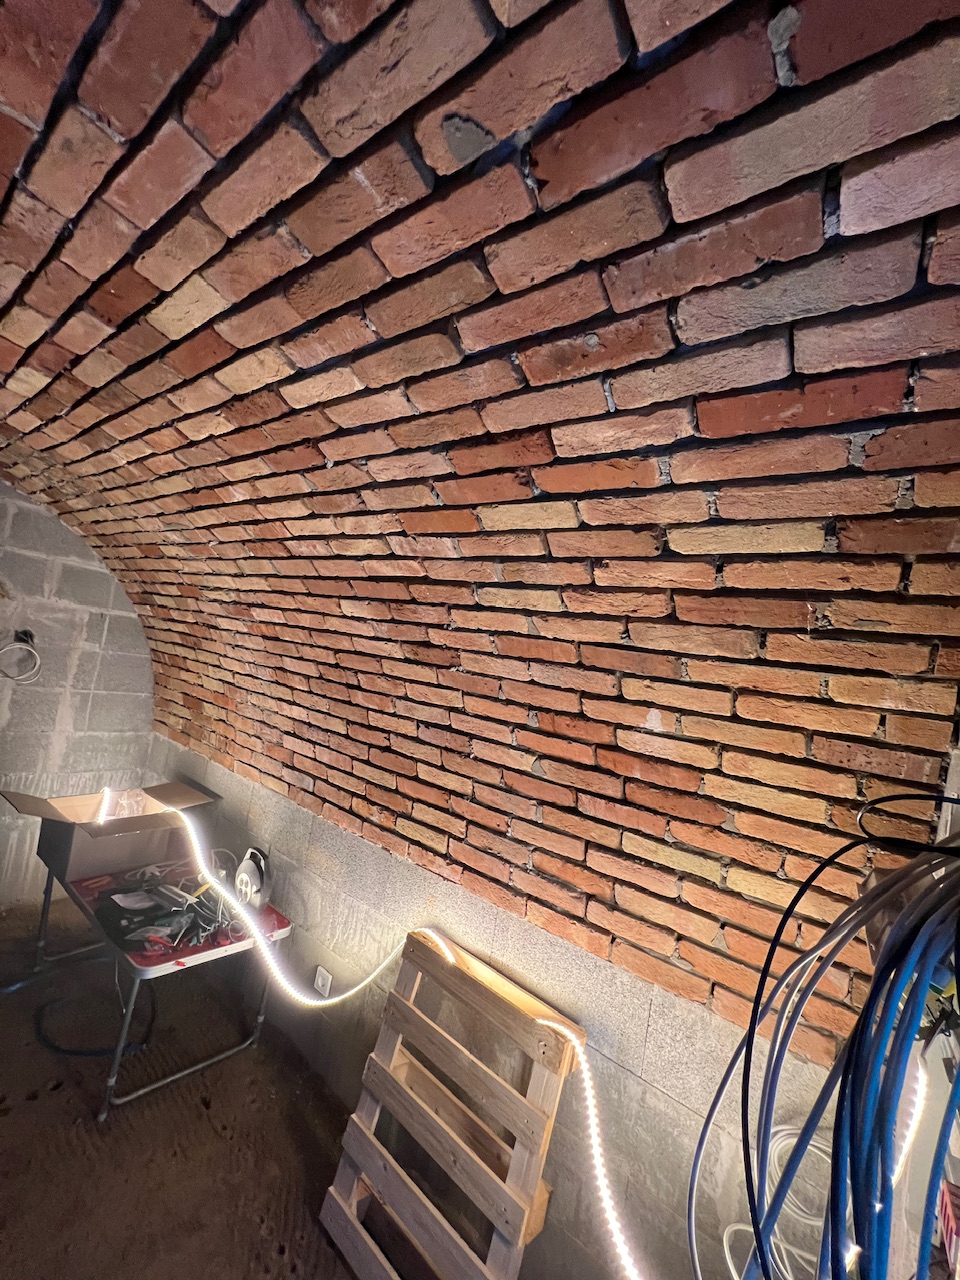
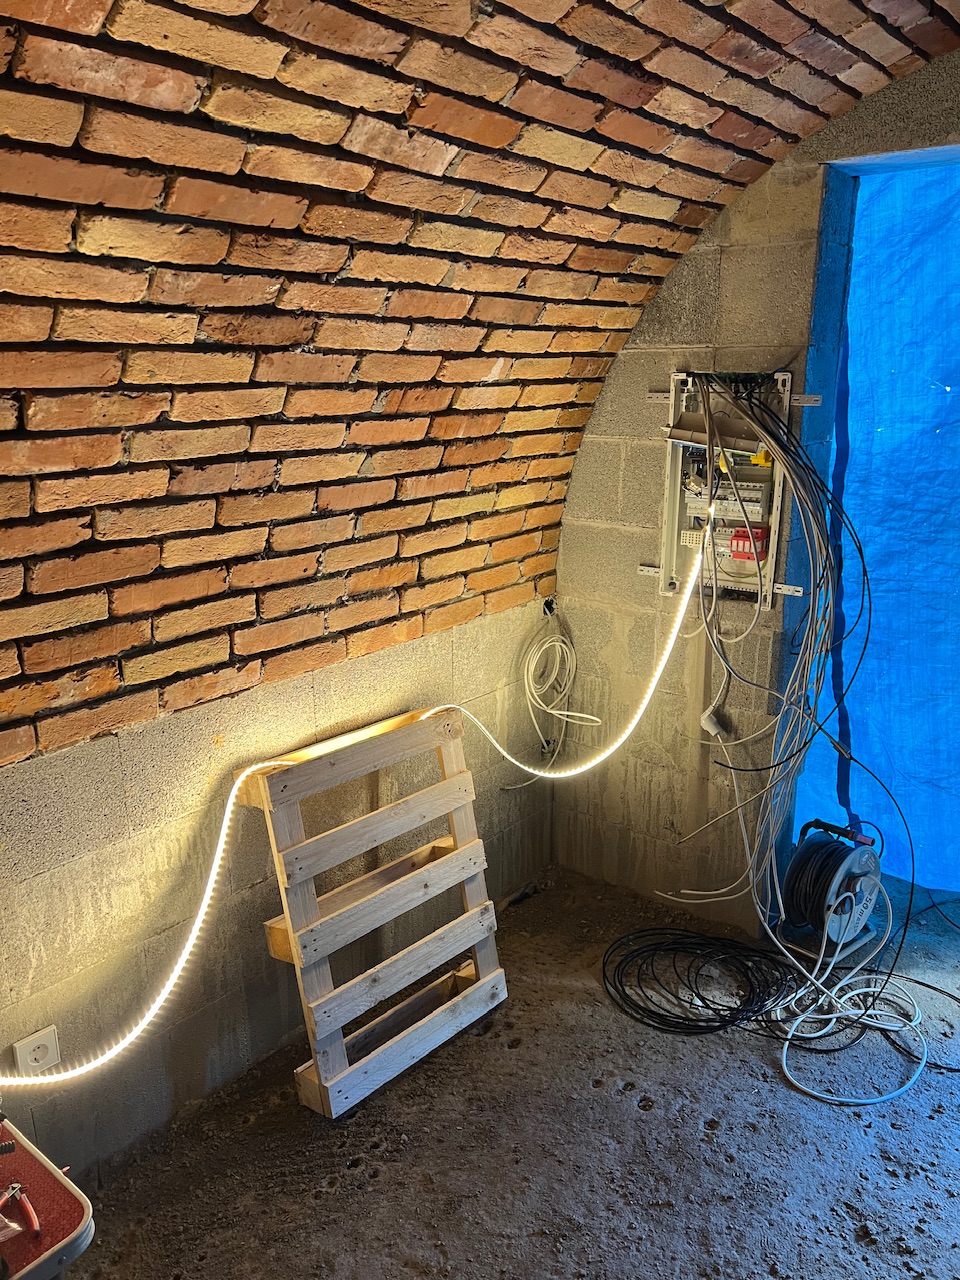
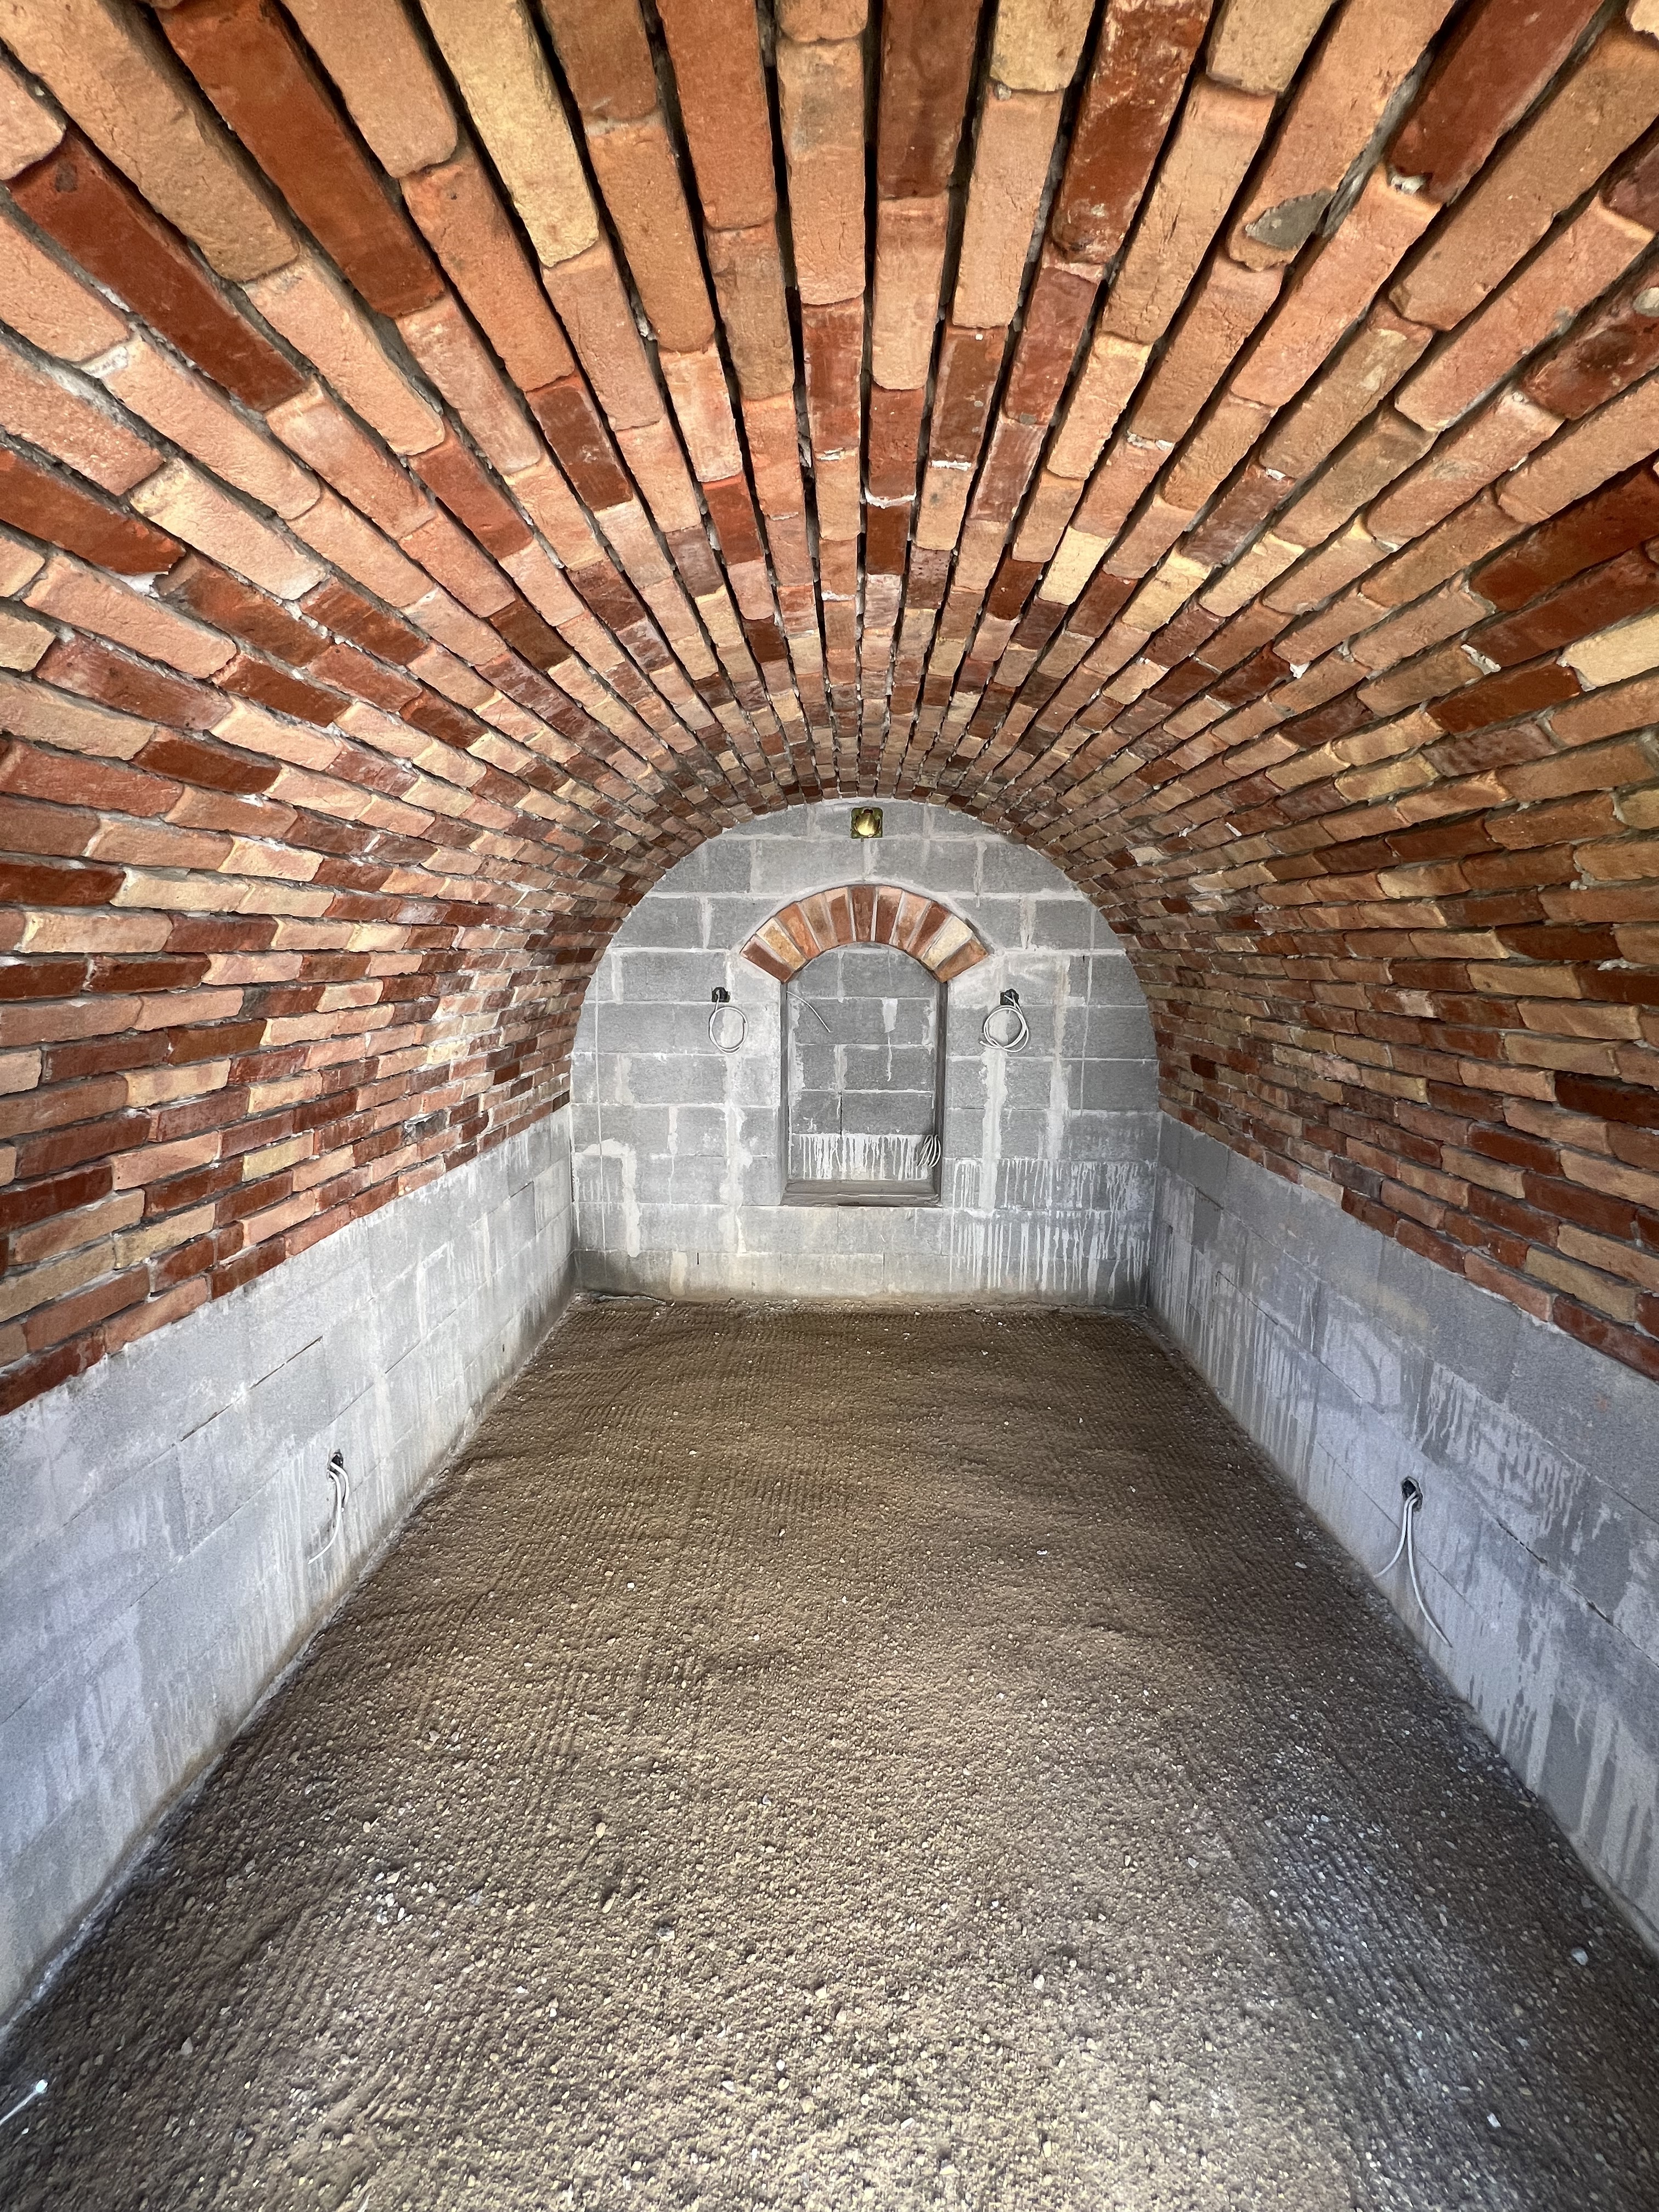
My partner also installed the electrical panel with 24V circuits for RGBW LED strips, a PoE WiFi access point and connected the wall outlets to the 230V main. It was temporarily connected to test how bright the strips will be. They will later be mounted in metal railings across the whole length of the lower brick line, with a wood cladding.

We will then have to dig a 20 meter trench from the house main electric supply, lay a PVC pipe and pull a 3-phase copper line to the cellar. This will be the garden hub to provide electricity to the future outdoor kitchen.

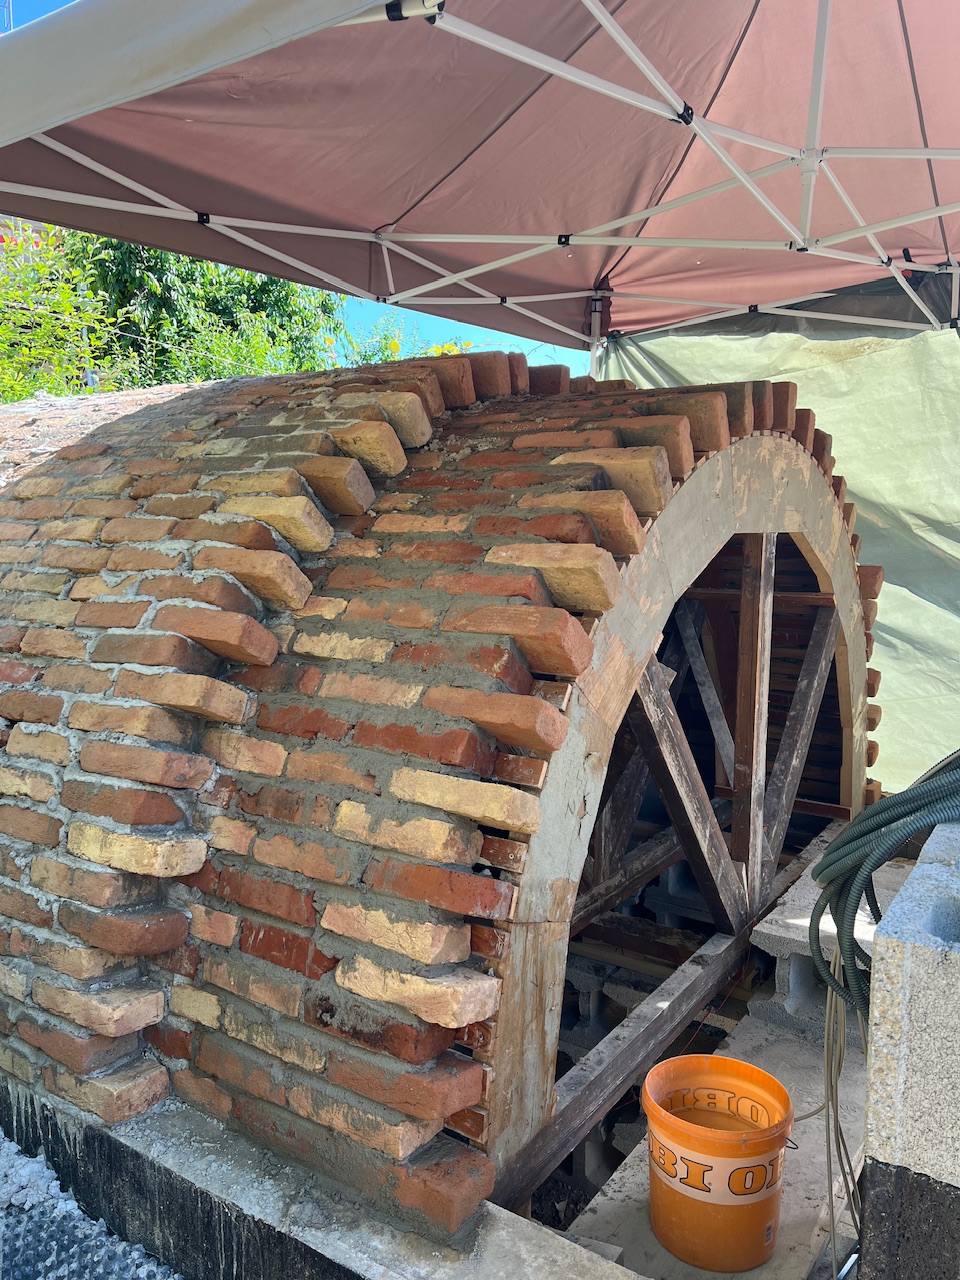
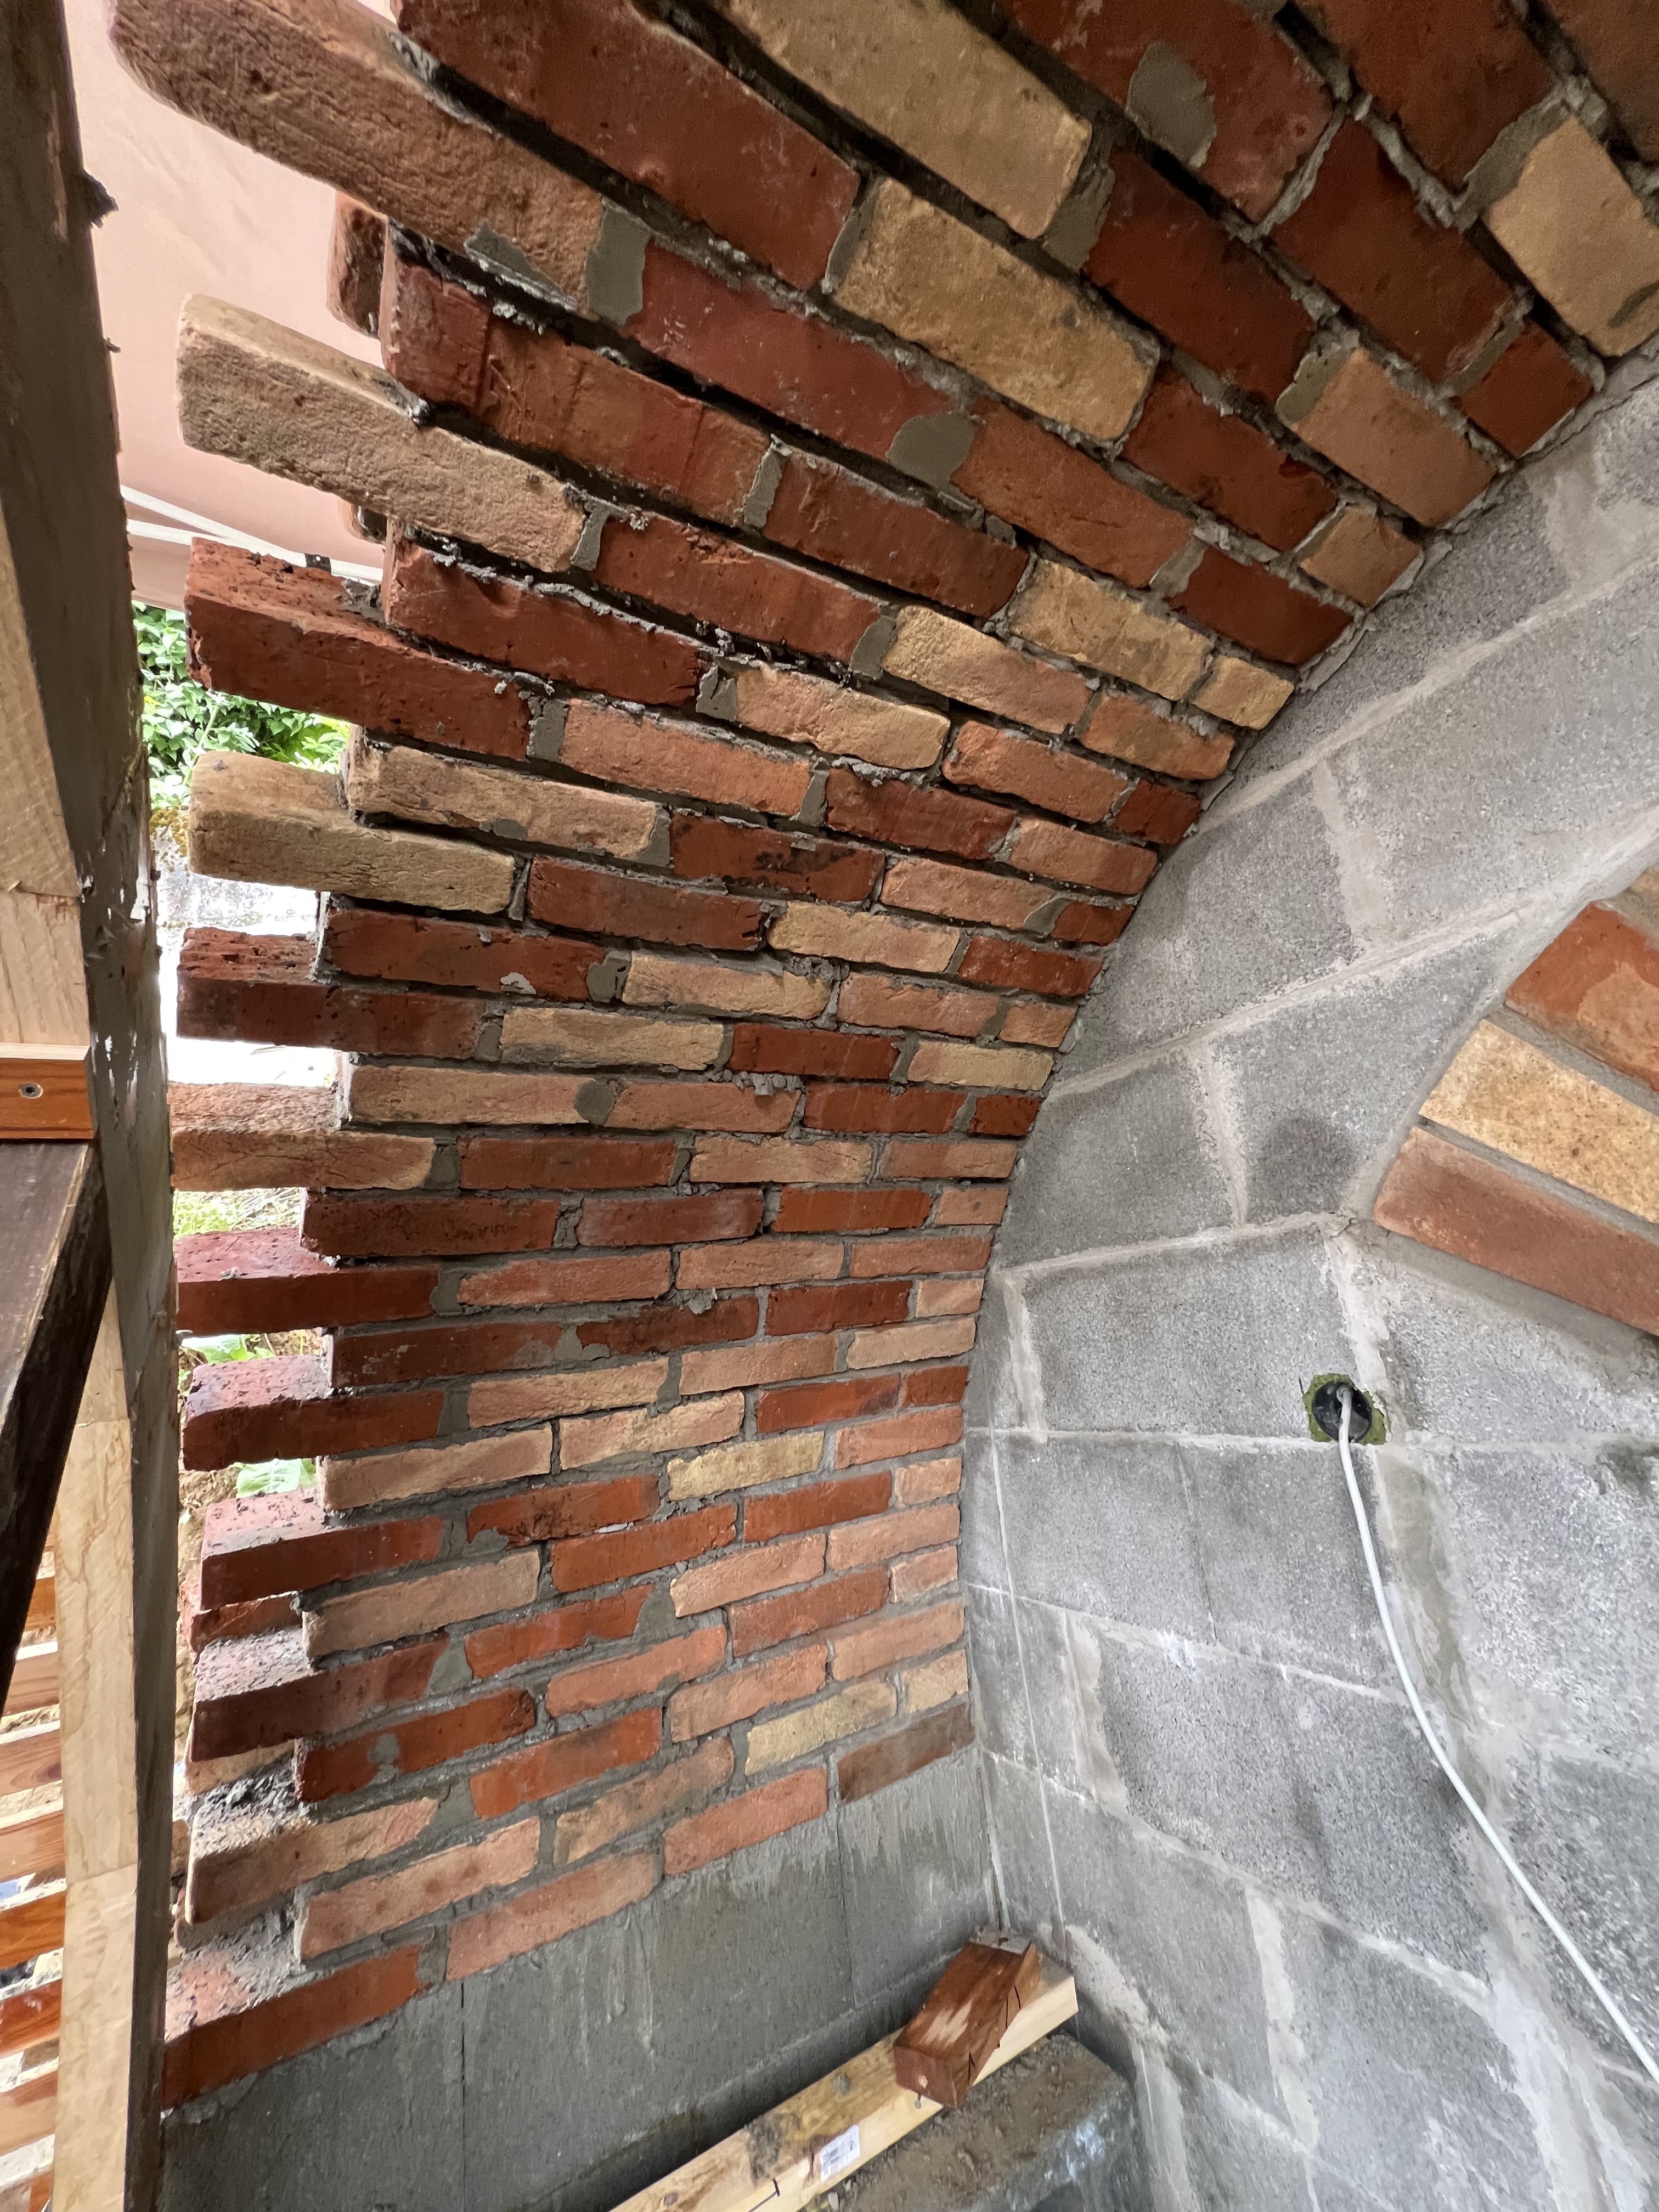
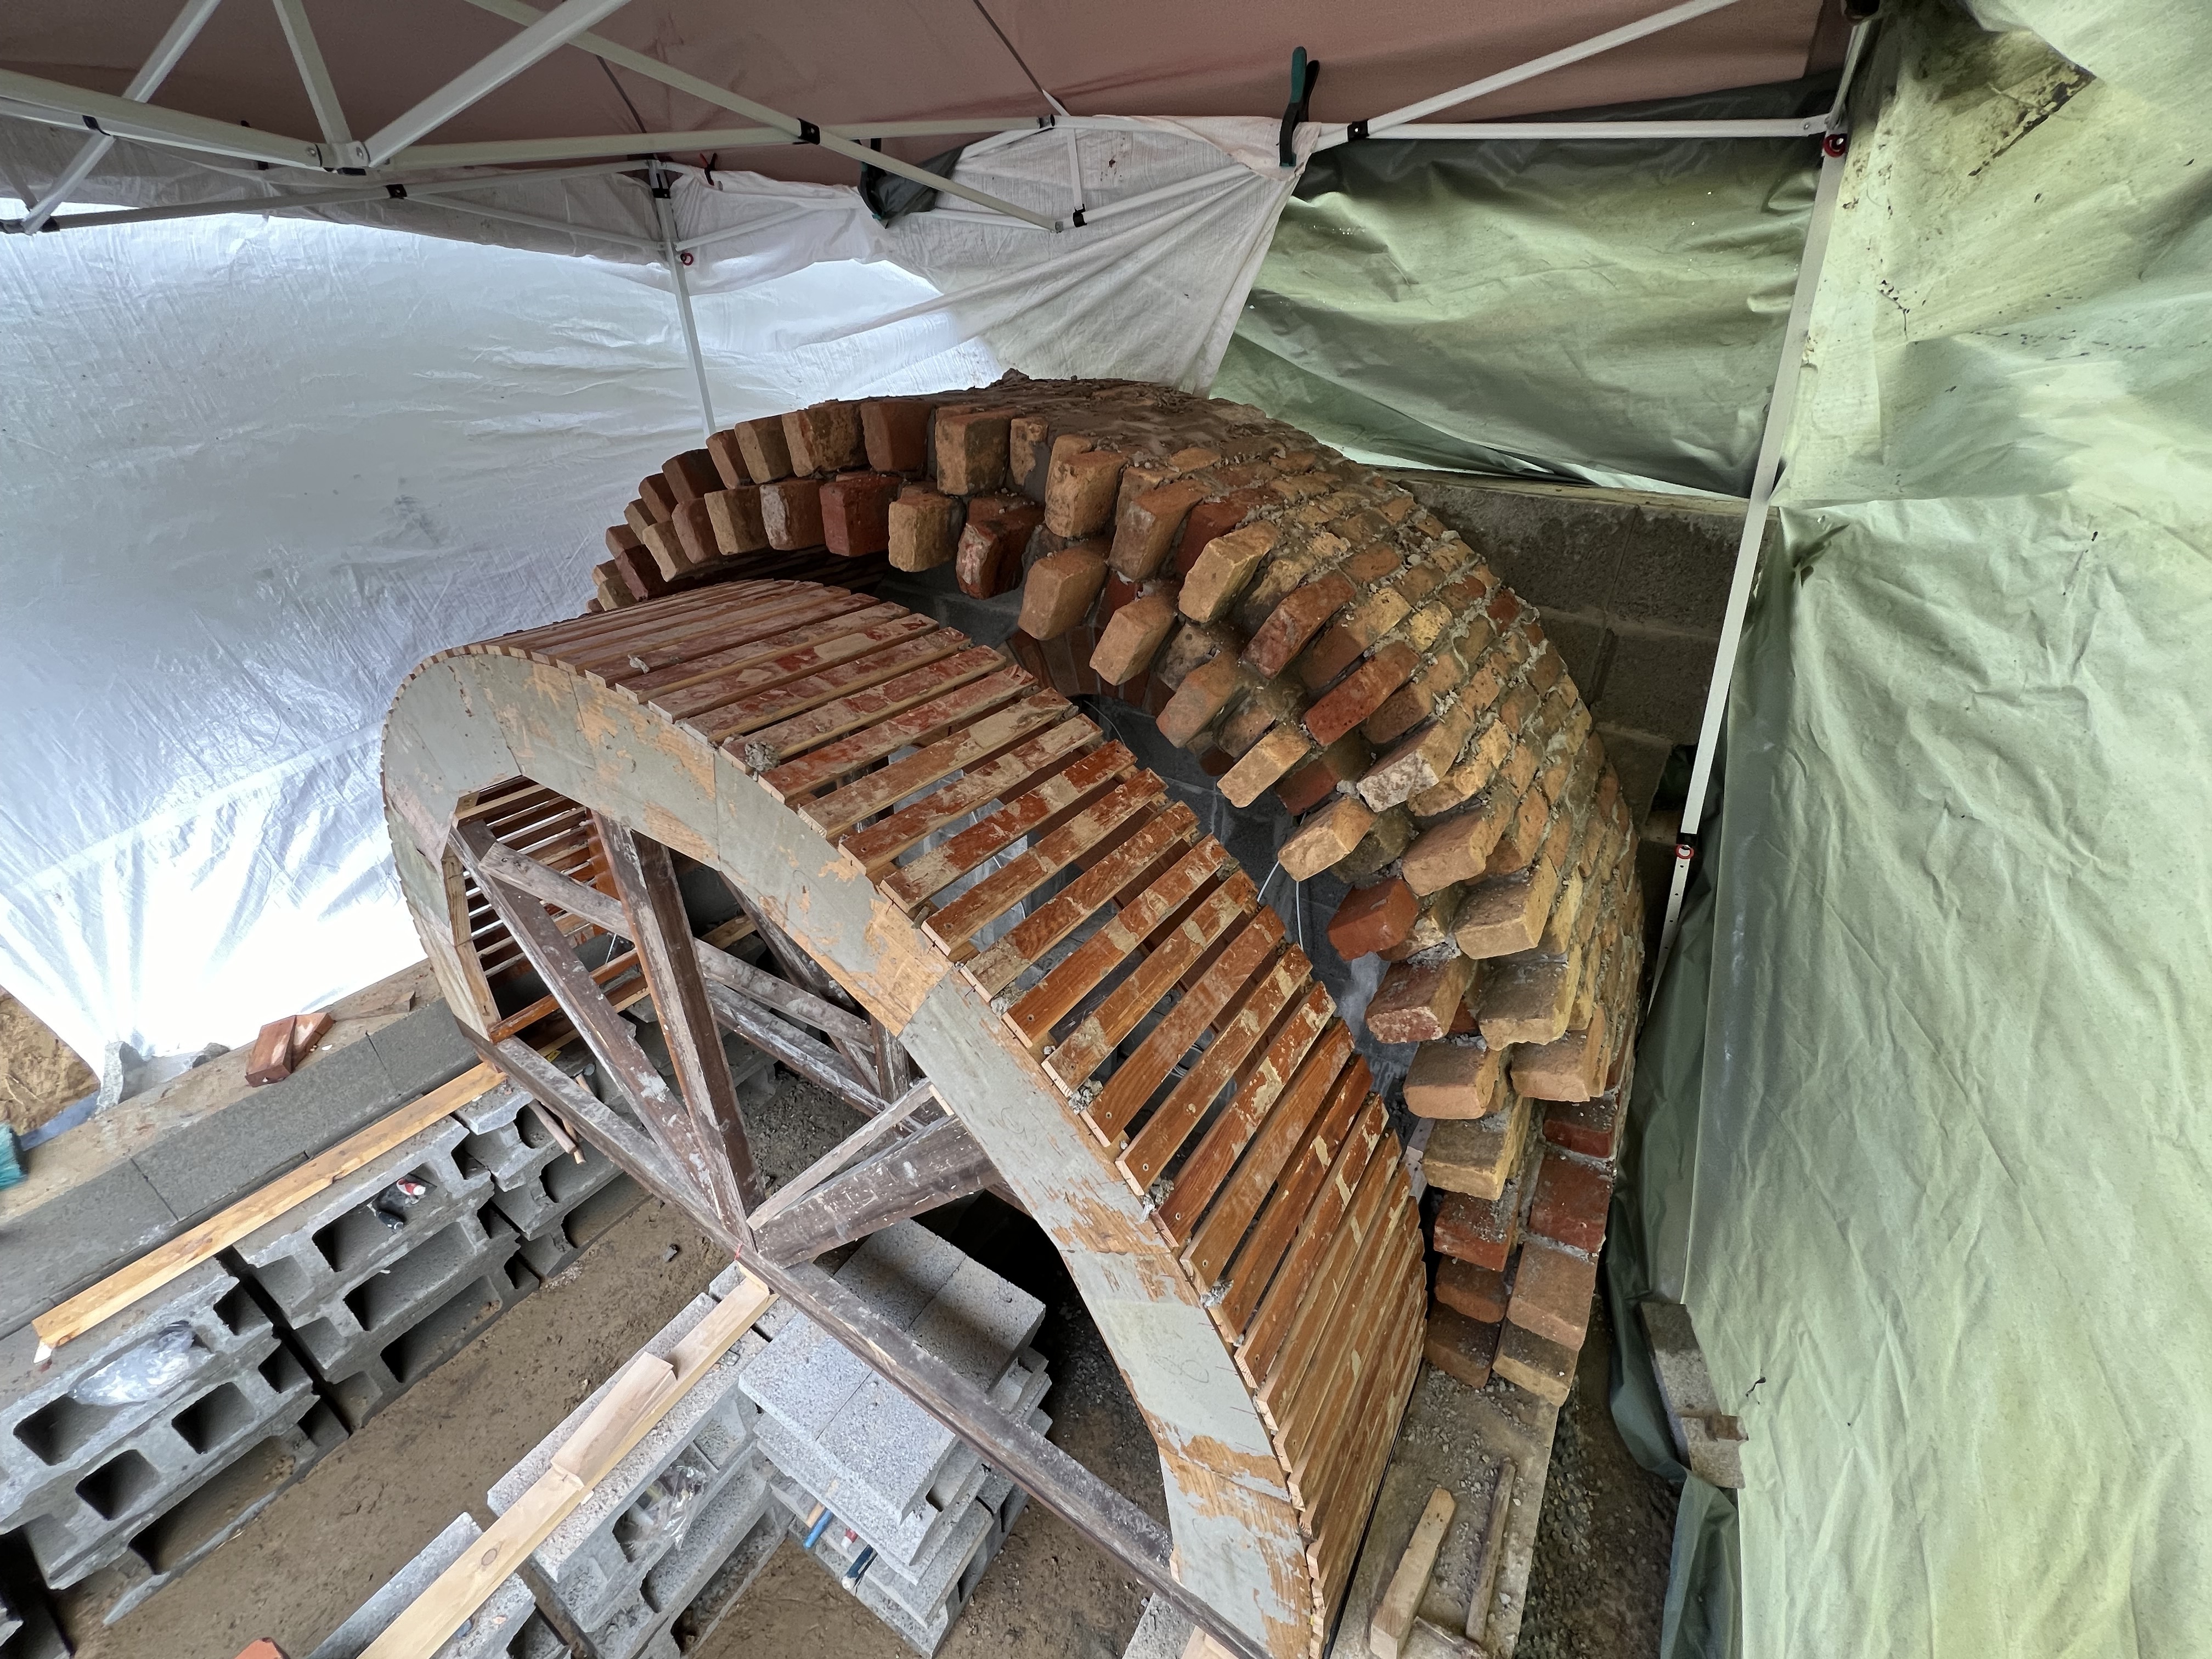
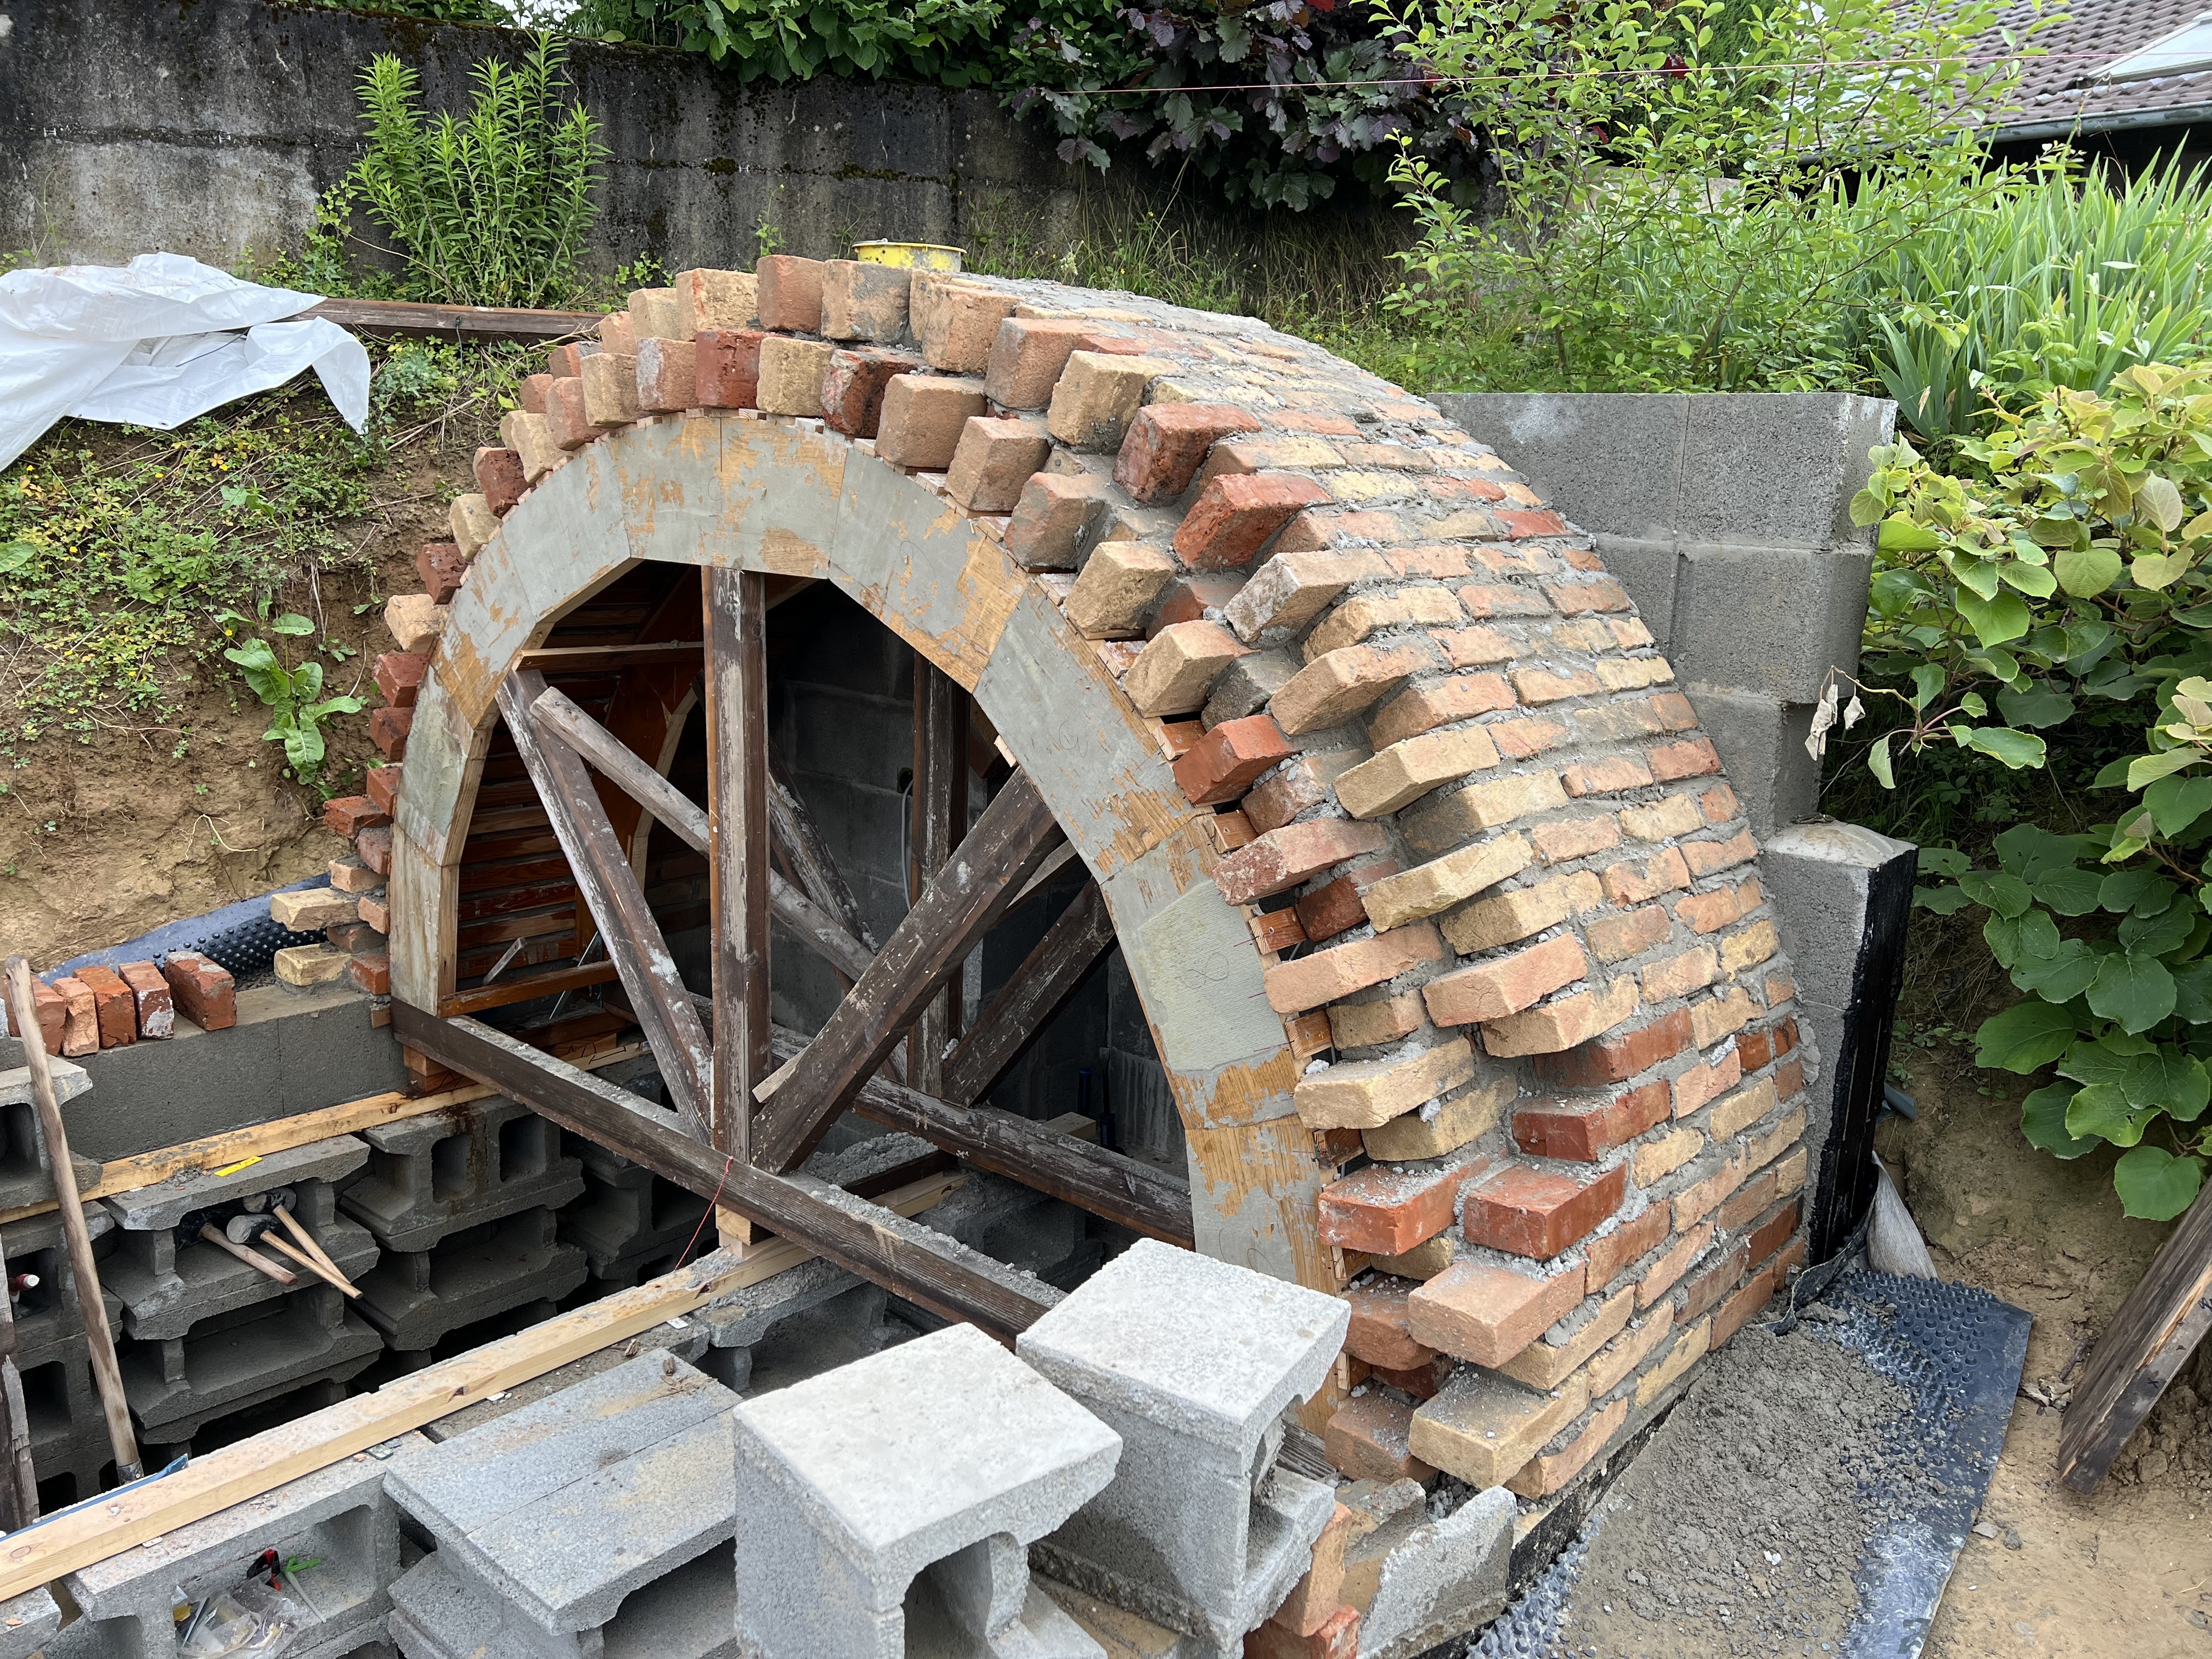
The next few days we will work on the mortar joints, using the multitool diamond blades that arrived in the mail to finish the cleanup before grouting all the joints cleanly.

Have a great week and keep on doing it yourself!

5


jerk-sock

jerk-sock on a vacuum


old car

old car


perfectly good tennis balls

perfectly good tennis balls


dry wall

dry wall


sharp blades

who needs sharp blades anyways


art degree

art degree


Any more suggestions?

6
8
submitted 3 months ago* (last edited 2 months ago) by morgunkorn@discuss.tchncs.de to c/diy@beehaw.org


Hi everyone

It's been a while, I skipped a couple of weeks to get things going on our project!

Last time I wrote we had finished 3 slices of the roof. In the meantime, we finished the 4 next ones and completed the roof.

Eventually we were able to do a complete layer in one day, the second one on top the following day, and move the wooden structure the third day.

We held off laying the last slice to finish the front wall (and be eventually able to attach the ceiling to it), making a door lintel out of cinderblocks and reinforced concrete.

The suspense was high whether we would have enough bricks to finish the project and it turned out we had just 3 extra at the end!

One of the bricks revealed a handwritten signature which turns out to mean "Ludwig Herman". We are still investigating who and when :)

Next, we will spend many hours cleaning the grout from the inside to free the bricks and make nice regular joints. Then we will insulate the outside with a pond liner and cover the root cellar under a thick layer of dirt.

See you soon!

7
4
submitted 3 months ago* (last edited 2 months ago) by morgunkorn@discuss.tchncs.de to c/diy@beehaw.org


Hello everyone! Thank you for all the positive comments last week.

We managed to double the length of the vaulted roof, laying the 3rd and 4th slice, in four 3 to 4-hour sessions.

The bricks are from old dismantled buildings, still covered in lime cement and need to be submerged in water and brushed individually. My SO is doing the laying, and I'm cleaning + assessing each brick.

We also get better with putting a smaller amount of grout to avoid spilling, because it's going to be a lot of work to clean all the joints.

This week, we expect to be able to lay 2 additional rows, and next week do the last slice, finish the door lintel (new word!) and front wall.

Lastly, a picture of me, because you know, we're getting familiar in the c/Do It Yourself family <3 Have a great week everyone!

8


Decided to build something rather complex as a first project and it's proving challenging at ever step of the way, but I'm really proud of how it's turning out.

We'll have a lot of work to clean the joints but it's going to be worth it I think. Something for the generations to come, if it doesn't collapse :-)

9


cross-posted from: https://beehaw.org/post/13852616

Pretty cool guide.

The guy says that he only recently realized that cleaning isn't intuitive so people need to be taught. This is for people who maybe haven't been taught how to clean or want to freshen up on their skills :)

10


I'm almost wrapped up with filling voids, bark inclusions, and knot holes in the boards for the bookcase. If our garage was climate controlled I expect this process would have gone faster; the same could be said if I had more horizontal working space for staging and filling. Once everything is done curing I should be able to go back over each board with the finishing grits to reach 220 - after that it's cutting to have a plumb edge and to create the shelf supports.

Since we're popping the grain in between sandings (spraying lightly with water and allowing to dry, which swells the softer grain and allows for a smoother finish) I've been able to see what these will sort of look like once finished, but the small bits of epoxy that made it over the edges of some of these really make the grain look downright sexy.

11


My girlfriend's deck was built out of untreated pine that was never painted or sealed. I dont see anywhere that any wood is rotted or broken yet, but many boards are cupping from the humidity and temperature changes over the last 4 years. If I buy a few gallons of exterior wood sealant and brush on a few layers on top and bottom would that keep the wood from warping any further and protect it from rotting? Do I need to test that the wood humidity is below a certain threshold before sealing? Where can I get a tool for testing wood dryness? Does sealant brand make a difference? I've loved BEHR paints in the past, they do a great job, but there is a brand called READY SEAL that is much cheaper and I'm wondering if its worth the savings or if there is a reason it is cheaper. All advice is welcome. Thanks

12
13


Kind of a busy week otherwise but progress is progress. I put comments on each image in the album to explain reasoning, goals, and steps taken - if you haven't done much carpentry I hope they help; if you have done much carpentry I hope you'll share your expertise. I've been around a bit and done a few things but this is not what I would call my specialty. Still, I'll do my best to answer any questions folks might have, even if I end up invoking Cunningham's Law.

I should quickly note that our house was not built to the same kinds of specifications found nowadays. Hell, it's not even built to the specifications in my books about building which were published in the same decade it was built. Improvements like fully gutting to run proper 2x8 timbers just isn't in the cards, even though it's what I would do if we were building from scratch.

14
1
submitted 7 months ago* (last edited 7 months ago) by Radiant_sir_radiant@beehaw.org to c/diy@beehaw.org


Not sure if I should post this here or over in Technology, but here goes.

So I need to run two Gigabit (or better) network cables from the main switch in the garage into another room.

The problem is that that room is a shelter (small bunker), which according to Swiss regulations means no holes in the walls, and the 'door' is an airtight 35cm thick slab of reinforced concrete and steel. So the only way into that room is a small conduit for electricity. There's no way two Cat7 cables fit into that conduit, and power and data cables are not allowed to share the same space anyway. That means the only viable option is fiber - and, considering the conduit's dimensions, only fiber without a connector will go through.

There are copper/POF adapters readily available (such as this one), and they would probably do the job. However, POF is effectively limited to ~1Gbit half-duplex. If I go through all the trouble of installing fiber, I don't want it to be inferior to the existing Cat7 copper cabling. If there's a multimode solution that doesn't require me to buy two four-figure Cisco switches and five-figure tools, I'd much prefer that. Has anyone here heard of such a thing?

15
2
DIY smartphone? (lemmy.dbzer0.com)
submitted 7 months ago* (last edited 7 months ago) by WeLoveCastingSpellz@lemmy.dbzer0.com to c/diy@beehaw.org


I am looking to building my own phone from a SBC running a linux distro with plasma mobile and that can make calls. and I have some questions:

Where can I start?

Which SBC to choose?

How would I achieve the call functionality?

16


We finished the last piece of the cat path I posted about earlier! This one goes from the laundry room, to the stairwell, and then into the guest bedroom on the upper floor (yes, I know the carpet needs replaced in that closet). They are already using them and seem to love the new path already.

https://imgur.com/a/QExCWgN

17


I appreciate a creative use of scrap lumber as much as the next person, but jeez. I'm getting tired of floating sistered joists and framing.

18
1
submitted 7 months ago* (last edited 7 months ago) by Vodulas@beehaw.org to c/diy@beehaw.org


My partner and I have been talking about making some cat paths in our house since long before we owned our house. We recently got 2 new dogs, so now it is a high priority project. The first step was putting up some shelves in the hallway and making a portal from the hallway to the bedroom closet (you can see it just above the tent). The surround for the portal is this 3D printed tunnel

https://www.printables.com/model/3068-cat-door

The next project is going to be putting a portal from the spare bedroom into the stairwell so they can go up and down floors without the dogs being in the way

https://i.imgur.com/rxI55E4.jpg

19


If you need advice that particular kind of DIY, feel free to post here and tag me or DM me directly. Hopefully I can be very helpful to some of you folks who either can't afford to pay expensive mechanics or want to learn on your own.

I work as an independent mobile mechanic in middle Tennessee (for now). My primary work is motorcycles and small engines, but I've done plenty of work on cars too. I used to post quite often on r/fixxit back before I left Reddit.

Pic is an example of my work. That's one of my motorcycles, which I resurrected from the dead. I took that picture while was riding to the small town of Cave-In-Rock, Illinois, to rebuild 4 carburetors for a customer, and in line waiting on a ferry to cross the Ohio river.

20


I'm (obviously) not great with caulk but needed to re-caulk where our kitchen counter meets the outside wall as it has a crack all along the counter. House was built about 20 years ago and it may be original and just settled.

Anyway, I watched a video and the person put down painters tape on the wall and along the counter so you could get a straight edge. They showed pulling off the tape pretty quickly after applying the caulk. I did so and the caulk pulled up from the counter (and, to a lesser extent away from the tile on the wall.)

Is this an OK technique to use, generally? What could I have done to keep this from happening? I had cleaned the surface well. Should I have pulled the tape off with an angle closer to the counter? I think I pulled it off about 45 degrees. Would it hurt to wait a little longer for the caulk to adhere to the surface a bit? I'm concerned if it starts to cure much at all that it will be harder to pull off the tape without pulling the caulk away from the wall.

Going to wait until it dries, then scrape it out and try again. This is a small section that I'm using to work on my technique.

Thanks.

21


I have a few project ideas, and I thought of reusing the paper from various shop catalogs that I receive in my physical mailbox. I'd like to make it stiffer, something more like cardboard. I read somewhere online that you could use corn starch for this, mixed with water. Would it work? Do you have better ideas?

22


Hi all. I'm splitting 2 XLR line level audio signals into 3 channels each. I bought one nice device (used) online called the Whirlwind SPL1x3LL (line level). Unfortunately I can't find another used one for a decent price. However there are plenty of mic impedance matched units, SPL1x3MIC which according to the manufacturer are identical except the impedance difference. I'm good at soldering and the devices are fully analog (no PCB), so I'm considering doing the conversion myself.

I was curious what it would likely take to convert the mic box to a line level box? Is it just a matter of adding a resistor somewhere? Seems like an easy way to save $100 without buying a brand new unit. I looked into my line level box and the is one component I don't recognize where the out signals split away from. My only hesitation is that I buy the device and end up needing a specific part or it turns into a larger job than anticipated. Just figured I'd entertain the idea before buying brand new. Thanks.

23


I am stripping and re-sealing a corner shower stall, and am having a hell of time removing all the old caulk. I also discovered the previous homeowners decided to just caulk over the previous caulk that was on there, so I am removing 2 or 3 layers depending on the location. It was leaking in the spots that had 3 layers so I think they just added more caulk to "fix" leaks. I have the chemical caulk remover, and that certainly helps, but it still is taking a metric fuck-ton of manual labor. Any tricks/suggestions for removal of very old caulk? I am about to throw a scotch brite on a palm sander and go to town.

24
25


I have been investigating the fine art of dishing out a wooden chair seat for comfort today, and made discoveries that can be readily condensed into a, imho miraculously easy formula. So here goes:

Your "sitz" bones or ischial tuberosities are prominences of the pelvis that are the hard spots when you sit. They are pretty consistently located in adult humans as it turns out, though you'll have a hard time finding dimensional data if you go looking! I measured approximate spacing among a slightly inebriated and jovial crowd who endured the indignity with humor and made a rough prototype seat to check my theory. Drill two 2-inch diameter holes spaced five inches apart at center (3-inches of material remaining between the holes). For a finished seat, one would shape the edges, but don't even bother for this experiment - just drill the holes in a piece of lumber and sit down on it. shift around for comfort and when your ischial tuberosities align with the holes you will say aaah!

I will be making two holes in a rectangular stool seat at this spacing, centered about three inches from the "back" edge of the stool, and sanding smooth and dishing out the seat a little. I'll try to remember to post a finished picture, but I found this preliminary result too great and dramatic to wait.

Some individuals might be grateful for a third hole at the centerline and about two inches closer to the back edge - where a tailbone-afflicted person does not need hard support and an average person will not miss it. I have not tested this third hole yet, maybe others will report...

view more: next ›